Tuesday, 22 August 2017

phishing attack from linux with 3g/4g mobile internet hotspot on wan

Setup Online to local machine Forwarding for SET Social Engineering Toolkit in Kali Linux

You will follow the given steps to setup  forwarding.
  1. Go on ngrok.com and click on Sign Up
    VirtualBox_Kali-Linux-2017
  2. Fill your detail and register.
    sign-up-on-ngrok
  3. Download ngrok zip file, choose appropriate architecture as per your system (64bit/32bit). otherwise you will face problem.
    download-ngrok
  4. Extract the files
  5. Run terminal and reach at location you have extracted ngrok file.
  6. After sign up on ngrok.com you will get two commands written there. Execute both commands in sequence.
    run-commands
  7. Start SET Social Engineering toolkit
    run-SET
    Select 1 > 2 > 3 > 2 options after starting toolkit and hit enter after pressing each key.
  8. It will ask for IP Address, Copy forwarding link generated by ngrok and paste here.
    copy
  9. Give the website name you want to create phishing page. (ex - www.facebook.com , www.gmail.com)
  10. Send link to victim and wait for logging him/her
    irctc.co.in login
  11. After Login
    result
I hope you like this article if you have any question comment in box.
Cheers!

how to use mobile network hotspot wan for website in linux / install ngrok / portword with mobile hotspot


Share Your Local Web Server Publicly using ngrok 

how to portword with linux mobile 3g 4g internet

without router share you your website

As a web developer, my workflow often includes writing a little code, firing up a local web server, and doing a quick smoke test to make sure things look alright. Occasionally, I'll encounter a situation where I'll need someone else (coworker, client, etc.) to provide some feedback on a design decision before moving forward. If I'm in the office, it's easy. I'll just call them over to take a look.

However, there are times when I need to share my local changes with someone remotely and get feedback quickly. If the change is relatively minor, deploying to some staging environment might be overkill. How can I expose my local web server publicly so my clients can view my changes and provide immediate feedback?

What is ngrok?


ngrok is a reverse proxy that creates a secure tunnel from a public endpoint to a locally running web service. ngrok captures and analyzes all traffic over the tunnel for later inspection and replay.

What can I do with ngrok?


  1. Expose any http service behind a NAT or firewall to the internet on a subdomain of ngrok.com.
  2. Expose any tcp service behind a NAT or firewall to the internet on a random port of ngrok.com.
  3. Inspect all http requests/responses that are transmitted over the tunnel.
  4. Replay any request that was transmitted over the tunnel.

What is ngrok useful for?


  1. Temporarily sharing a website that is only running on your development machine.
  2. Demoing an app at a hackathon without deploying.
  3. Developing any services which consume webhooks (HTTP callbacks) by allowing you to replay those requests.
  4. Debugging and understanding any web service by inspecting the HTTP traffic.
  5. Running networked services on machines that are firewalled off from the internet.
  6. use mobile internet , sim internet and hotspot internet worldwide without port fwding 
  7. use your internet for wan attack (settoolket phishing and ratattack with metaspoilt)

Enter, ngrok!


ngrok, creates a secure tunnel from a randomly-assigned, public internet address to a locally running web service. It also captures any traffic moving through the tunnel, allowing users to inspect HTTP request data. ngrok has several uses, and publicly exposing a local web server is one of them.

Installation


There really is no "installation" required. You simply visit the download page and follow the instructions.

i am using kali linux so i will download linux (3)  after download extract  the zip file and copy the extracted file at "/usr/local/bin

steps to extract zip file and copy to the bin location with terminal 

  • open command line, press CTRL + ALT + T
  • extract the zip file and copy to /usr/local/bin (assuming the zip file is in ~/Downloads)
  • cd ~/Downloads
    sudo unzip ngrok-stable-linux-amd64.zip -d /usr/local/bin/
  • done!
 ?Install your authtoken (auth code below is a example copy auth token from ngrok.com account.Copy the authentication code from your account in ngrok.com we will be using this to authenticate our tunnel. You can do this by going to the folder where ngrok is stored and using .(GO TO NGROK WEBSITE SIGN IN AND THEN COPY AUTH CODE
/ngrok authtoken

yourauthtokenhere � The authentication code will then be saved.
Example Authtoken Screen Shot Shows Ngrok Auth Code (This account is not used by HackingVision and was deleted after this tutorial)

?To create your first secure tunnel use the command below to set up a tunnel on port 80 I�m using http port 80 for SET use whatever port you would like ngrok to tunnel through.


 Now you should be able to run ngrok command from anywhere, because the ngrok binary is already copy to /usr/local/bin/.


 How to use ngrok

Let's say you have a local web server running on port 80, and you want to make that localhost accessible through the internet using ngrok, then you need to run this command:
ngrok http 80
ngrok http [port-number]

 i am running my localhost with apache2 with html simple website you can run your apache2 by this command 

 service apache2 start


Once ngrok is launched, it will display the following:

1
2
3
4
5
6
7
8
9
ngrok (Ctrl+C to quit)
 
Tunnel Status                 online
Version                       1.7/1.7
Forwarding                    http://2779ffc7.ngrok.com -> 127.0.0.1:3000
Forwarding                    https://2779ffc7.ngrok.com -> 127.0.0.1:3000
Web Interface                 127.0.0.1:4040
# Conn                        0
Avg Conn Time                 0.00ms

Using the information provided above, we have our public web address: http://2779ffc7.ngrok.com. We can share this URL with our collaborators! Any visits to this URL will be tunneled to our local web server. As people visit the URL, ngrok will update by displaying any HTTP requests flowing through the tunnel:
1
2
3
4
5
HTTP Requests
-------------
 
GET /favicon.ico              200 OK
GET /                         200 OK

Further Request Inspection with the Dashboard

ngrok provides a introspection dashboard which is hosted locally at http://localhost:4040/.


Since all HTTP traffic is captured by ngrok, more detailed information about each request can be explored on the dashboard. The dashboard updates in real-time. So, as people view your exposed website, the dashboard will update along with each request. You can explore request time, duration, headers, parameters, etc. It even pretty-prints JSON and XML responses to make them easier to read.


Thursday, 10 August 2017

how to create wishing page from linux

if you want to remove rockstardevil from website than paytm me 10 dollar !!!! contact detail - instagram rockstardevil34


For this Web App, you Need to create a Four Files
1 - index.php
2 - userwish.php
3 - db.php
4 - .htaccess
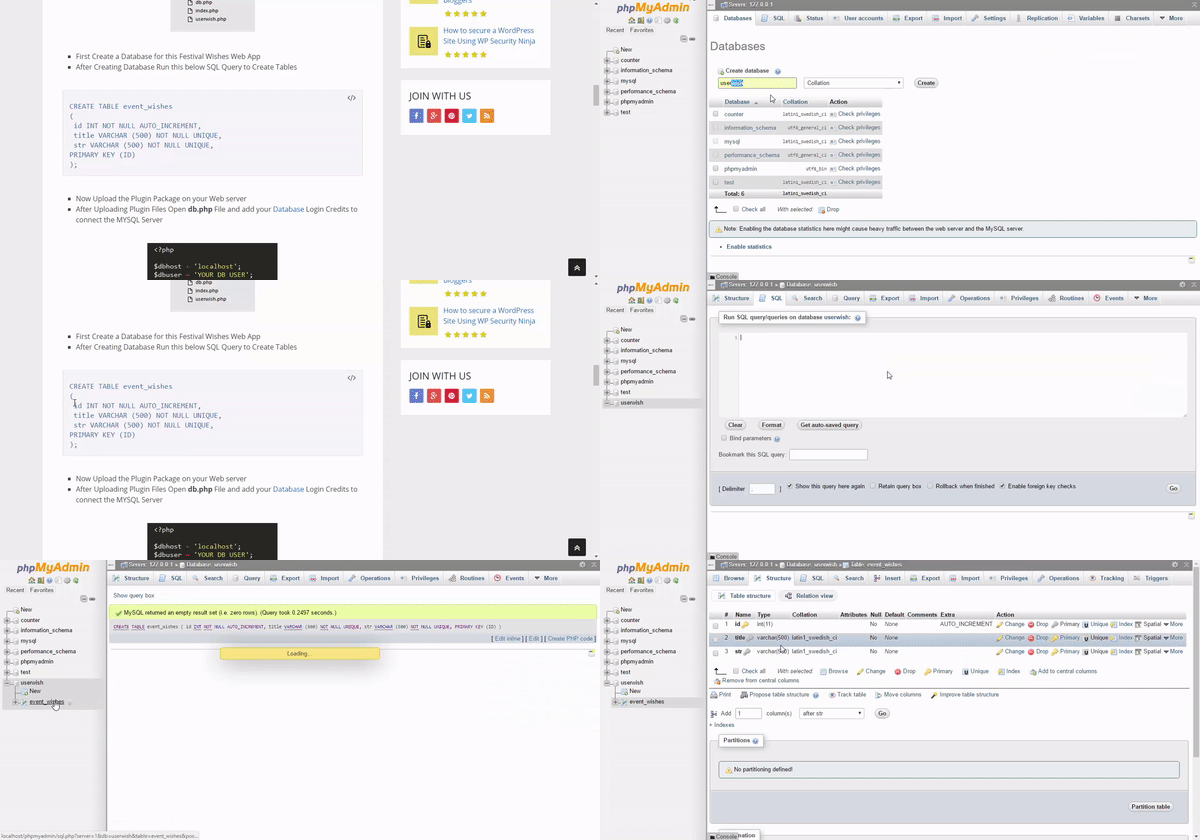
  • First Create a Database on your Webserver
  • After creating the Database run this SQL Query to create Tables for the Web App
    CREATE TABLE event_wishes
    (
    id INT NOT NULL AUTO_INCREMENT,
    title VARCHAR (500) NOT NULL UNIQUE,
    str VARCHAR (500) NOT NULL UNIQUE,
    PRIMARY KEY (ID)
    );
27
  • After creating Database Tables create Three files
  • index.php - Homepage
  • userwish.php - Greeting Page
  • db.php - For MYSQL Database Connection
  • Now Add this Below code on db.php File
        <?php

$dbhost = 'localhost';
$dbuser = 'YOUR DB USER';
$dbpass = 'YOUR DB PASS';
$dbname = 'YOUR DB NAME';

$con=mysqli_connect($dbhost, $dbuser, $dbpass,$dbname) //connect to the database server
or die ("Could not connect to mysql because ".mysqli_error());

mysqli_select_db($con,$dbname) //select the database
or die ("Could not select to mysql because ".mysqli_error());

?>
* Add your Database login credits and Save the db.php File * Add this Below code on index.php File
<?php

/*
Plugin Name: MSK Festival Wishes Web App
Plugin URI: https://www.allwebtuts.com/festival-wishes-web-app/
Description: Festival Wishes Web App - A PHP Plugin Which Helps us to Create an Awesome SEO Friendly Festival Event Wishing Web App with Custom Greeting Wishes Page.
Version: 1.1
Author: Santhosh veer
Author URI: https://www.mskian.com
License: GPLv2 or later
License URI: http://www.gnu.org/licenses/gpl-2.0.html
*/


include('db.php');

if(isset($_POST['create-wish']))
{

$title=mysqli_real_escape_string($con,$_POST["title"]);
$title=htmlentities($title);

//friendly URL conversion
function to_prety_url($str){
if($str !== mb_convert_encoding( mb_convert_encoding($str, 'UTF-32', 'UTF-8'), 'UTF-8', 'UTF-32') )
$str = mb_convert_encoding($str, 'UTF-8', mb_detect_encoding($str));
$str = htmlentities($str, ENT_NOQUOTES, 'UTF-8');
$str = preg_replace('`&([a-z]{1,2})(acute|uml|circ|grave|ring|cedil|slash|tilde|caron|lig);`i', '\1', $str);
$str = html_entity_decode($str, ENT_NOQUOTES, 'UTF-8');
$str = preg_replace(array('`[^a-z0-9]`i','`[-]+`'), '-', $str);
$str = strtolower( trim($str, '-') );
return $str;
}
$str=to_prety_url($title);

// sql query for inserting data into database
$sql_query = "INSERT INTO event_wishes (title,str) VALUES ('$title','$str')";
$result_set=mysqli_query($con,$sql_query);

// Redirect to Greeting Page
//Replace http://localhost/$str with your Greeting WEB APP URL
header("Location: http://localhost/$str");
exit();

}

?>

<!DOCTYPE html>
<html lang="en" itemscope itemtype="http://schema.org/WebSite">
<head>
<meta charset="utf-8">
<meta http-equiv="X-UA-Compatible" content="IE=edge,chrome=1">
<meta name="viewport" content="width=device-width, initial-scale=1">
<?php $current_page = "http://$_SERVER[HTTP_HOST]$_SERVER[REQUEST_URI]";
echo '<link rel="canonical" href="'.$current_page.'" itemprop="url"/>'; ?>


<!-- Edit the Meta Tags Add your Own Meta Contents -->
<!-- Seo Meta Tags -->
<title>Mskian Festival Wishes Web App</title>
<meta name="description" content="Create an Awesome Name Wishing Festival Web App."/>
<meta name="robots" content="index,follow">
<link href='YOUR FAVICON URL' rel='icon' type='image/x-icon'/>

<!-- Twitter Card data -->
<meta name="twitter:card" content="summary">
<meta name="twitter:title" content="Mskian Festival Wishes Web App" />
<meta name="twitter:description" content="Create an Awesome Name Wishing Festival Web App." />
<meta name="twitter:image" content="THUMBNAIL IMAGE FOR TWITTER SHARE" />
<meta name="twitter:site" content="@yourtwitterusername" />
<meta name="twitter:creator" content="@yourtwitterusername" />

<!-- Facebook Open Graph data -->
<meta property="og:title" content="Mskian Festival Wishes Web App" />
<meta property="og:type" content="website"/>
<meta property="og:url" content="YOUR WEB APP URL" />
<meta property="og:image" content="THUMBNAIL IMAGE FOR FACEBOOK SHARE" />
<meta property="og:description" content="Create an Awesome Name Wishing Festival Web App." />
<meta property="og:site_name" content="YOUR SITE NAME" />
<meta property="fb:app_id" content="APP ID" />

<!-- Google+ Meta Tags. -->
<meta itemprop="name" content="Mskian Festival Wishes Web App">
<meta itemprop="description" content="Create an Awesome Name Wishing Festival Web App.">
<meta itemprop="image" content="THUMBNAIL IMAGE FOR GOOGLE+ SHARE">


<link href="https://maxcdn.bootstrapcdn.com/bootstrap/3.3.6/css/bootstrap.min.css" rel="stylesheet">
<link href='https://fonts.googleapis.com/css?family=Montserrat:400,700' rel='stylesheet' type='text/css'>


<style type="text/css">
body {
font-family: 'Montserrat', sans-serif;
font-size: 18px;
}

h1{
font-size: 2.3em;
font-weight: 600;
margin: 20px 0 10px 0;
letter-spacing: -1px;
}


.login-form {
margin: 0 auto !important;
float: none;
padding: 15px;
}

.login-form form.form-horizontal {
padding: 10px 20px;
}

.bold{
font-weight: 700;
}
</style>

<!-- HTML5 shim and Respond.js IE8 support of HTML5 elements and media queries -->
<!--[if lt IE 9]>
<script src="https://oss.maxcdn.com/libs/html5shiv/3.7.0/html5shiv.js"></script>
<script src="https://oss.maxcdn.com/libs/respond.js/1.3.0/respond.min.js"></script>
<![endif]-->

</head>
<body>
<br />
<br />


<div class="col-md-6 col-lg-5 col-sm-8 center-block well login-form">
<h2 class="no-margin text-center">Create Greeting</h2>
<div class="clearfix">&nbsp;</div>
<form method="post" class="form-horizontal" data-parsley-validate>
<div class="form-group">
<input type="text" class="form-control" name="title" placeholder="Your Name" data-parsley-required="true">
</div>
<div class="form-group">
<button type="submit" name="create-wish" class="btn btn-success btn-block btn-lg">Create Wish</button>
</div>
</form>
</div>
</div>
<div class="clearfix">&nbsp;</div>


<!-- JavaScript -->
<script src="https://ajax.googleapis.com/ajax/libs/jquery/1.11.3/jquery.min.js"></script>
<script src="https://maxcdn.bootstrapcdn.com/bootstrap/3.3.6/js/bootstrap.min.js"></script>
<script src="https://cdnjs.cloudflare.com/ajax/libs/parsley.js/2.5.1/parsley.min.js"></script>

</body>
</html>
* Find this Below on the index.php file * Replace it with your Web App URL
header("Location: http://localhost/$str");
* Add this below code on userwish.php File
<?php

include("db.php");

$str=mysqli_real_escape_string($con,$_GET["str"]);

//Get data's from the Table
if(isset($str))
{

$sql_query="SELECT * FROM event_wishes WHERE str='$str'";
$result_set=mysqli_query($con,$sql_query) or die('error');
$user_wish=mysqli_fetch_array($result_set);
}
?>

<!DOCTYPE html>
<html lang="en" itemscope itemtype="http://schema.org/WebSite">
<head>
<meta charset="utf-8">
<meta http-equiv="X-UA-Compatible" content="IE=edge,chrome=1">
<meta name="viewport" content="width=device-width, initial-scale=1">
<?php $current_page = "http://$_SERVER[HTTP_HOST]$_SERVER[REQUEST_URI]";
echo '<link rel="canonical" href="'.$current_page.'" itemprop="url"/>'; ?>

<!-- Edit the Meta Tags Add your Own Meta Contents -->
<!-- Seo Meta Tags -->
<title><?php echo $user_wish['title']; ?> Wishing your happy independence day</title>
<meta name="description" content="<?php echo $user_wish['title']; ?> Wish you a happy independence day Here is your happy independence day Greeting Wishes."/>
<link href='YOUR FAVICON URL' rel='icon' type='image/x-icon'/>

<!-- Twitter Card data -->
<meta name="twitter:card" content="summary">
<meta name="twitter:title" content="<?php echo $user_wish['title']; ?> Wishing your happy independence day" />
<meta name="twitter:description" content="<?php echo $user_wish['title']; ?> Wish you a happy independence day Here is your happy independence day Greeting Wishes." />
<meta name="twitter:image" content="THUMBNAIL URL IMAGE FOR TWITTER SHARE" />
<meta name="twitter:site" content="@yourtwitterusername" />
<meta name="twitter:creator" content="@yourtwitterusername" />

<!-- Facebook Open Graph data -->
<meta property="og:title" content="<?php echo $user_wish['title']; ?> Wishing your happy independence day" />
<meta property="og:type" content="article"/>
<meta property="og:url" content="<?= "http://example.com".$_SERVER['REQUEST_URI']; ?>" />
<meta property="og:image" content="THUMBNAIL IMAGE URL FOR FACEBOOK SHARE" />
<meta property="og:description" content="<?php echo $user_wish['title']; ?> Wish you a happy independence day Here is your happy independence day Greeting Wishes." />
<meta property="og:site_name" content="YOUR SITE NAME" />
<meta property="fb:app_id" content="APP ID" />
<meta content='YOUR FACEBOOK PROFILE URL' property='article:author'/>
<meta property="article:publisher" content="YOUR FACEBOOK PAGE URL" />

<!-- Google+ Meta Tags. -->
<meta itemprop="name" content="<?php echo $user_wish['title']; ?> Wishing your happy independence day">
<meta itemprop="description" content="<?php echo $user_wish['title']; ?> Wish you a happy independence day Here is your happy independence day Greeting Wishes.">
<meta itemprop="image" content="THUMBNAIL IMAGE URL FOR GOOGLE+ SHARE">


<link href="https://maxcdn.bootstrapcdn.com/bootstrap/3.3.6/css/bootstrap.min.css" rel="stylesheet">
<link href='https://fonts.googleapis.com/css?family=Montserrat:400,700' rel='stylesheet' type='text/css'>


<style type="text/css">
body {
font-family: 'Montserrat', sans-serif;
font-size: 18px;
}

h1{
font-size: 2.3em;
font-weight: 600;
margin: 20px 0 10px 0;
letter-spacing: -1px;
}


.login-form {
margin: 0 auto !important;
float: none;
padding: 15px;
}

.login-form form.form-horizontal {
padding: 10px 20px;
}

.bold{
font-weight: 700;
}
</style>

<!-- HTML5 shim and Respond.js IE8 support of HTML5 elements and media queries -->
<!--[if lt IE 9]>
<script src="https://oss.maxcdn.com/libs/html5shiv/3.7.0/html5shiv.js"></script>
<script src="https://oss.maxcdn.com/libs/respond.js/1.3.0/respond.min.js"></script>
<![endif]-->

</head>
<body>
<br />
<br />


<h2 class="no-margin text-center">Hello <?php echo $user_wish['title']; ?> Wishing you a happy independence day :-) </h2>
<br />


<div class="col-md-6 col-lg-5 col-sm-8 center-block well login-form">
<h2 class="no-margin text-center">Create Your Own Greeting Wish Like this</h2>
<div class="clearfix">&nbsp;</div>
<form method="post" action="index.php" class="form-horizontal" data-parsley-validate>
<div class="form-group">
<input type="text" class="form-control" name="title" placeholder="Your Name" data-parsley-required="true">
</div>
<div class="form-group">
<button type="submit" name="create-wish" class="btn btn-success btn-block btn-lg">Create Wish</button>
</div>
</form>
</div>
</div>
<div class="clearfix">&nbsp;</div>


<!-- JavaScript -->
<script src="https://ajax.googleapis.com/ajax/libs/jquery/1.11.3/jquery.min.js"></script>
<script src="https://maxcdn.bootstrapcdn.com/bootstrap/3.3.6/js/bootstrap.min.js"></script>
<script src="https://cdnjs.cloudflare.com/ajax/libs/parsley.js/2.5.1/parsley.min.js"></script>

</body>
</html>
  • Now Find this Below line on userwish.php
<form method="post" action=index.php class="form-horizontal" data-parsley-validate>
  • Replace index.php With your Festival Wishes Web App Homepage URL
  • Add this Rule on HTACCESS File for SEO Friendly URL
    RewriteEngine On
    RewriteRule ^([a-zA-Z0-9_-]+)$ userwish.php?str=$1
  • That's all successfully we created a Festival Wishing Web App
When he/she Enter his/her name to create a Festival Greeting Wishes It will Generate a Festival Greeting Wishes with Custom SEO URL + Greeting Page
All the user's data are Saved in Database
Recommended PHP Version 5.6 and 7
Database Extension - MYSQLI
DB Support - MYSQL 5.6, MARIA DB 10 and Latest versions

Saturday, 22 July 2017

Book Review: Kali Linux Revealed by Raphael Hertzog

Book Review: "Kali Linux Revealed"

"Kali Linux Revealed: Mastering the Penetration Testing Distribution", by Raphael Hertzog, Jim O'Gorman (elwood), and Mati Aharoni (muts), with a forward by Johnny Long, was probably the most underwhelming infosec book I've read all year. I was expecting to learn about hacking and information security and instead got a book on mostly the Debian OS. Don't get me wrong, it's a decent book about Debian Linux fundamentals and provides pretty core information for any Linux user. 'Kali Linux Revealed' (KLR) is not really about information security or the curated collection of tools that makes the Kali distribution so renowned, as much as it is about the underlying operating system that Kali is now built on, Debian (as opposed to the previous BackTrack releases built on Knoppix). While the authors are up front about this in the introduction, I purchased the book based on the cover, so I hope this review makes it clear what the book entails for any other potential buyers out there. I purchased the book via Amazon at $26 for ~300 pages; Ultimately, I thought this was overpriced as the book presented some pretty standard material and could have been slimmed down considerably. I give the book 4/10 stars, as I felt it was less about hacking and information security and more about fundamental Debian Linux concepts. I recommend the book to novice hackers, such as those who are looking to get a deeper understanding of the Linux operating system, and specifically script kiddies who want to learn more about how Linux package management works, as opposed to individuals with strong foundations who are looking to learn more about information security. In my opinion, only a few chapters actually delved into advanced Kali specifics, namely Chapter 1, Chapter 7, and Chapter 9, mostly everything else was Debian focused with just a mention of Kali to stay relevant, as you can see from the chapter listing below:


Chapter 1: About Kali Linux
1.1 A Bit of History
1.2 Relationship with Debian
1.3 Purpose and Use Cases
1.4 Main Kali Linux Features
1.5 Kali Linux Policies
1.6 Getting Started
Chapter 2: Getting Started with Kali Linux
2.1 Downloading a Kali ISO Image
2.2 Booting a Kali ISO Image in Live Mode
2.3 Summary
Chapter 3: Linux Fundamentals
3.1 What Is Linux and What Is It Doing?
3.2 The Command Line
3.3 The File System
3.4 Useful Commands
3.5 Summary
Chapter 4: Installing Kali Linux
4.1 Minimal Installation Requirements
4.2 Step by Step Installation on a Hard Drive
4.3 Unattended Installations
4.4 ARM Installations
4.5 Troubleshooting Installations
4.6 Summary
Chapter 5: Configuring Kali Linux
5.1 Configuring the Network
5.2 Managing Unix Users and Unix Groups
5.3 Configuring Services
5.4 Managing Services
5.5 Summary
Chapter 6: Helping Yourself and Getting Help
6.1 Documentation Sources
6.2 Kali Linux Communities
6.3 Filing a Good Bug Report
6.4 Summary
Chapter 7: Securing and Monitoring Kali Linux
7.1 Defining a Security Policy
7.2 Possible Security Measures
7.3 Securing Network Services
7.4 Firewall or Packet Filtering
7.5 Monitoring and Logging
7.6 Summary
Chapter 8: Debian Package Management
8.1 Introducing APT
8.2 Basic Package Interaction
8.3 Advanced APT Configuration and Usage
8.4 Package Reference: Digging Deeper into the Debian Package System
8.5 Summary
Chapter 9: Advanced Usage
9.1 Modifying Kali Packages
9.2 Recompiling the Linux Kernel
9.3 Building Custom Kali Live ISO Images
9.4 Adding Persistence to the Live ISO with a USB Key
9.5 Summary
Chapter 10: Kali Linux in the Enterprise
10.1 Installing Kali Linux Over the Network (PXE Boot)
10.2 Leveraging Configuration Management
10.3 Extending and Customizing Kali Linux
10.4 Summary
Chapter 11: Introduction to Security Assessments
11.1 Kali Linux in an Assessment
11.2 Types of Assessments
11.3 Formalization of the Assessment
11.4 Types of Attacks
11.5 Summary
Chapter 12: Conclusion: The Road Ahead
12.1 Keeping Up with Changes
12.2 Showing Off Your Newly Gained Knowledge
12.3 Going Further

Overall, it was a decent book and reminded me of my college computer science days, learning about Linux operating system fundamentals. My biggest complaint with the book is that it spends the majority of it's time covering the Debian Linux OS features, as opposed to the stock security tools that make the Kali OS so uniquely different from other distros. My favorite part of the book was honestly the Intro by Johnny and some of the first chapter where you get the evolution of the tool set and specifically the transformation of BackTrack into Kali. I also enjoyed both the Securing and Monitoring Kali Linux and Advanced Usage chapters (7 and 9), probably being my overall favorite chapters of the book. I also really liked the part on managing and setting the state of a suite of Kali machines using Salt, in Chapter 10. And I did learn a ton about Debian and package management in general, although that's not what I was expecting when I picked this book up, hence the bluntly honest review to make it clear what this book contains and what it doesn't contain. Another reason I felt there was a lot of filler material / the book did not present new material, is that a good amount of the material has already been covered online and for free, such as the installation guides, the ARM builds, setting up persistent USBs, and even the VM prep stuff. The fact that all of that free material was repeated and the excessive number of screenshots made it feel like filler content at times. The Kali site itself includes all of these free docs and a free ebook that has many of the Kali specific parts listed and contains a heavy overlap of content with this book. Finally, I really didn't like the final chapter, which tried to summarize many core security and information assurance principles into a few super simple intros. I also do not agree that this book sets you up to take either the Pentesting w/ Kali Linux courses or the OSCP certification, as the authors suggest at the end of the final chapter, where they also mention their free course Metasploit Unleashed. This book is good for someone who is still learning about the operating systems and underlying technologies, a more junior person, whereas I would recommend the OSCP certification to someone who has more intermediate hacking experience and is looking to challenge themselves. Offensive Security launched a new cert along w/ the book, the KLCP (a Kali Linux Certified Professional) and an accompanying BlackHat training, but I'm not sure who the target audience is for $5k introductory course to Debian Linux? As far as I could tell, there is nothing presented in this book that is particularly new, unique, or that couldn't be found on The Internet for free. 

comment:


This books covers how to install Kali Linux and how to deploy it in an enterprise environment. I bought it to learn more about the features of the distro itself and I am happy to have gained a good insight from that perspective.

I see however that some users were expecting more from this book i.e penetration testing tools. They are not covered in this book. Consider it an official insightful manual of the distribution and not the tools.
 

Firefox Add-ons a Hacker Must Have

11 Firefox Add-ons a Hacker Must Have


1. Tamper Data
Tamper data is a great tool to view and modify HTTP/HTTPS headers and post parameters. We can alter each request going from our machine to the destination host with this. It helps in security testing web applications by modifying POST parameters. It can be used in performing XSS and SQL Injection attacks by modifying header data.
Add Tamper data to Firefox:
https://addons.mozilla.org/en-us/firefox/addon/tamper-data/

2. Firebug
Firebug is a nice add-on that integrates a web development tool inside the browser. With this tool, you can edit and debug HTML, CSS, and JavaScript live on any webpage to see the effect of changes. It helps while analyzing JS files to find XSS vulnerabilities. It�s a very helpful add-on for finding DOM based XSS for security testing professionals.
Add Firebug to your browser:
https://addons.mozilla.org/en-US/firefox/addon/firebug/

3. Hackbar
Hackbar is a simple penetration tool for Firefox. It helps in testing simple SQL injection and XSS holes. You cannot execute standard exploits but you can easily use it to test whether or not vulnerability exists. You can also manually submit form data with GET or POST requests. It also has encryption and encoding tools. Most of the time, this tool helps while testing XSS vulnerability with encoded XSS payloads. It also supports keyboard shortcuts to perform various tasks. I am sure most people in the security field already know about this tool. Hackbar is mostly used in finding POST XSS vulnerabilities because it can send POST data manually to any page you like. With the ability to manually send POST form data, you can easily bypass client side validations. If your payload is being encoded at client side, you can use an encoding tool to encode your payload and then perform the attack. If the application is vulnerable to XSS, I am sure you will find the vulnerability with the help of the Hackbar add-on to Firefox browser.
Add Hackbar to Firefox:
https://addons.mozilla.org/en-US/firefox/addon/hackbar/

4. Cookies Manager 
Cookie Manager is one of the greatest tools ever created. Using this tool you can actually play with cookies. You can alter almost every cookie using this tool. You can use Cookies Manager to view, edit, and create new cookies. It also displays extra information about cookies, allowing you to edit multiple cookies at once and backup/restore them.
Add Cookies Manager to Firefox:
https://addons.mozilla.org/en-US/firefox/addon/cookies-manager-plus/

5. NoScript
No Script add-on is greatness beyond imagination. With this tool, you can monitor each and every script running on a website; you can block any of the scripts and see what each script actually does. But this add-on is for experts, newbies will face problems using this. Note: If you are testing XSS, HTTPS header modifications, or Injection attacks on any website, you need to disable this plugin first because it will block your efforts.
Add NoScript to Firefox:
https://addons.mozilla.org/en-us/firefox/addon/noscript/

6. Grease Monkey
Grease Monkey is the counter part to NoScript, its function is the exact opposite of Noscript. We use Noscript to block scripts and GreaseMonkey to run them. It allows you to customize the way a web page displays or behaves by using small bits of JavaScript. 
Add Grease Monkey to Firefox:
https://addons.mozilla.org/en-US/firefox/addon/greasemonkey/

7. User Agent Switcher

User Agent Switcher adds a one-click user agent switch to the browser, along with a menu and tool bar button. Whenever you want to switch the user agent, use the browser button. User Agent add-on helps in spoofing the browser while performing an attack.
Add User Agent Switcher to Firefox:
https://addons.mozilla.org/en-US/firefox/addon/user-agent-switcher/

8. CryptoFox
CryptoFox is an encryption or decryption tool for Mozilla Firefox. It supports most of the available encryption algorithms so you can easily encrypt or decrypt data with supported encryption algorithms. This add-on comes with dictionary attack support to crack MD5 cracking passwords. Although it hasn�t always had great reviews, it works satisfactorily.
Add CryptoFox to Firefox:
https://addons.mozilla.org/en-US/firefox/addon/cryptofox/

9. SQL Inject Me
SQL Inject Me is another nice Firefox add-on used to find SQL injection vulnerabilities in web applications. This tool does not exploit vulnerabilities but displays their existence. SQL injection is one of the most harmful web application vulnerabilities, it can allow attackers to view, modify, edit, add, or delete records in a database. This tool sends escape strings through form fields and searches database error messages. If it finds a database error message, it marks the page as vulnerable. Hackers can use this tool for SQL injection testing.
Add SQL Inject Me to Firefox:
https://addons.mozilla.org/en-us/firefox/addon/sql-inject-me/ 

10.  XSS ME
Cross Site Scripting is the most common web application vulnerability. This add-on is incredibly useful for detecting XSS vulnerabilities in web applications. XSS-Me is used to find reflected XSS vulnerabilities from a browser. It scans all forms of the page, and then performs an attack on selected pages with pre-defined XSS payloads. After the scan is complete, it lists all the pages that rendered a payload, and may be vulnerable to XSS attack. Then, you can manually test the web page to determine whether or not the vulnerability exists.
Add XSS ME to Firefox:
https://addons.mozilla.org/en-us/firefox/addon/xss-me/

11.  Passive Recon
Last but not the least, Passive Recon is an information gathering tool.
Passive Recon provides information security professionals the ability to perform �packetless� discoveries of target resources utilizing publicly available information. It gathers information in the same manner as DnsStuff tool, available on backtrack.

Add PassiveRecon to Firefox:
https://addons.mozilla.org/en-US/firefox/addon/passiverecon/


That�s all for today. I hope you�re enjoying your journey towards becoming a Professional Hacker. Have fun! Keep learning.