John the Ripper usage examples.
These examples are to give you some tips on what John�s features can be used for.
Command line.
1. First, you need to get a copy of your password file. If your system uses shadow passwords, you may use John�s �unshadow� utility to obtain the traditional Unix password file, as root:
 umask 077
 unshadow /etc/passwd /etc/shadow > mypasswd
(You may need to replace the filenames as needed.)
Then make �mypasswd� available to your non-root user account that you will run John under. No further commands will need to be run as root.
If your system is ancient enough that it keeps passwords right in the world-readable /etc/passwd, simply make a copy of that file.
If you�re going to be cracking Kerberos AFS passwords, use John�s �unafs� utility to obtain a passwd-like file.
Similarly, if you�re going to be cracking Windows passwords, use any of the many utilities that dump Windows password hashes (LM and/or NTLM) in Jeremy Allison�s PWDUMP output format. Some of these utilities may be obtained here:
http://www.openwall.com/passwords/pwdump
2. Now, let�s assume you�ve got a password file, �mypasswd�, and want to crack it. The simplest way is to let John use its default order of cracking modes:
john mypasswd
This will try �single crack� mode first, then use a wordlist with rules, and finally go for �incremental� mode. Please refer to
MODES for more information on these modes.
It is highly recommended that you obtain a larger wordlist than John�s default password.lst and edit the �Wordlist = �� line in the configuration file (see
CONFIG) before running John. Some wordlists may be obtained here:
http://www.openwall.com/wordlists/
Of those available in the collection at the URL above, all.lst (downloadable as all.gz) and huge.lst (only available on the CD) are good candidates for the �Wordlist = �� setting.
3. If you�ve got some passwords cracked, they are stored in $JOHN/john.pot. The john.pot file is not meant to be human-friendly. You should be using John itself to display the contents of its �pot file� in a convenient format:
john --show mypasswd
If the account list gets large and doesn�t fit on the screen, you should, of course, use your shell�s output redirection.
You might notice that many accounts have a disabled shell. You can make John skip those in the report. Assuming that the disabled shell is called �/etc/expired�, the command would be:
john --show --shells=-/etc/expired mypasswd
or shorter, but will also match �/any/path/expired�:
john --show --shells=-expired mypasswd
or if you also want to ignore some other shell, say �/etc/newuser�:
john --show --shells=-expired,newuser mypasswd
To check if any root (UID 0) accounts got cracked:
john --show --users=0 mypasswd
or to check for cracked root (UID 0) accounts in multiple files:
john --show --users=0 *passwd* *.pwd
To display the root (username �root�) account only:
john --show --users=root mypasswd
And finally, to check for privileged groups:
john --show --groups=0,1 mypasswd
4. You might prefer to manage the cracking modes manually. It is wise to start with �single crack� mode:
john --single mypasswd
or since the GNU-style double dashes are optional and since option names can be abbreviated for as long as they remain unambiguous:
john -si mypasswd
You should not abbreviate options in scripts which you would want to work with future versions of John since what is unambiguous now might become ambiguous with the addition of more options.
If you have more files to crack, it is preferable to load them at the same time:
john --single passwd1 passwd2
or even:
john --single *passwd* *.pwd
This way, John will run faster and might even crack more passwords than it would if you ran it on each password file separately.
5. To catch weak passwords not derived from readily available users� personal information, you should proceed with cracking modes demanding more processor time. First, let�s try a tiny wordlist with word mangling rules enabled:
john --wordlist=password.lst --rules mypasswd
or abbreviating the options:
john -w=password.lst -ru mypasswd
Then proceed with a larger wordlist, also applying the mangling rules:
john --wordlist=all.lst --rules mypasswd
If you�ve got a lot of spare disk space to trade for performance and the hash type of your password files is relatively slow, you may use John�s �unique� utility to eliminate any duplicate candidate passwords:
 john --wordlist=all.lst --rules --stdout | unique mangled.lst
 john --wordlist=mangled.lst mypasswd
If you know that your target hash type truncates passwords at a given length, you may optimize this even further:
 john --wordlist=all.lst --rules --stdout=8 | unique mangled8.lst
 john --wordlist=mangled8.lst mypasswd
Alternatively, you may simply use huge.lst available on Openwall wordlist collection CDs. It has word mangling rules pre-applied for the most common languages and it has any duplicates purged.
Depending on target hash type, the number of different salts (if applicable), the size of your wordlist, rules, and processor performance, wordlist-based cracking may take anywhere from under a second to many days.
You do not have to leave John running on a (pseudo-)terminal. If running John on a Unix-like system, you can simply disconnect from the server, close your xterm, etc. John will catch the SIGHUP (�hangup� signal) and continue running. Alternatively, you may prefer to start it in the background right away:
john --wordlist=all.lst --rules mypasswd &
Obviously, the �&� is specific to Unix shells and will not work on most other platforms.
You may further enhance this by specifying a session name:
john --session=allrules --wordlist=all.lst --rules mypasswd &
This ensures that you won�t accidentally interfere with the instance of John running in the background if you proceed to start other sessions.
To view the status of a running session, use:
john --status
for the default session or:
john --status=allrules
for any other session. This works for both interrupted and running sessions. To obtain the most up-to-date information from a running session on a Unix-like system, send a SIGHUP to the appropriate �john� process.
Any interrupted sessions may be continued with:
john --restore
or:
john --restore=allrules
Finally, to make John have less impact on other processes, you should set the option �Idle = Y� in the configuration file (see
CONFIG). The default may vary depending on the version and build of JtR.
To only crack accounts with a �good� shell (in general, the shell, user, and group filters described above work for all cracking modes as well):
john --wordlist=all.lst --rules --shells=sh,csh,tcsh,bash mypasswd
Like with all other cracking modes, it is faster to crack all the files you need cracked simultaneously:
john --wordlist=all.lst --rules passwd1 passwd2
You can crack some passwords only. This will try cracking all root (UID 0) accounts in all the password files:
john --wordlist=all.lst --rules --users=0 *passwd*
Alternatively, you may wish to not waste time cracking your very own passwords, if you�re sure they�re uncrackable:
john --wordlist=all.lst --rules --users=-root,solar *passwd*
Sometimes it is useful to split your password hashes into two sets which you crack separately, like:
 john --wordlist=all.lst --rules --salts=2 *passwd*
 john --wordlist=all.lst --rules --salts=-2 *passwd*
This will make John try salts used on two or more password hashes first and then try the rest. Total cracking time will be almost the same, but you will get some passwords cracked earlier, which is useful, for example, for penetration testing and demonstrations to management. Similarly, you may check all password hashes with a small wordlist, but only those that you can check faster (with ��salts=2�) with a larger one. With large numbers of password hashes and/or with a highly non-uniform distribution of salts, it may be appropriate to use a threshold larger than 2 with ��salts� (sometimes even values as high as 1000 will do).
Note that the default wordlist rules include �:� (a no-op � try words as they are in the list) on the first line. If you already ran through a wordlist without using rules, and then decided to also try the same wordlist with rules, you�d better comment this line out.
6. The most powerful cracking mode in John is called �incremental� (not a proper name, but kept for historical reasons). You can simply run:
john --incremental mypasswd
or:
john -i mypasswd
This will use the default �incremental� mode parameters, which are defined in the configuration file�s section named either [Incremental:ASCII] (for most hash types) or [Incremental:LM_ASCII] (for Windows LM hashes). By default, the [Incremental:ASCII] parameters are set to use the full printable ASCII character set (95 characters) and to try all possible password lengths from 0 to 13 (if the current hash type has a lower maximum password length, incremental mode�s length limit is reduced accordingly). [Incremental:LM_ASCII] is similar, except that it takes advantage of LM hashes being case-insensitive and of their halves being limited to 7 characters each.
Don�t expect �incremental� mode sessions to terminate in a reasonable time (unless all the passwords are weak and get cracked), read
MODES for an explanation of this.
In some cases it is faster to use some other pre-defined incremental mode parameters and only crack simpler passwords, from a limited character set. The following command will try 10 different characters only, passwords from �0� to �99999999999999999999� (in an optimal order):
john -i=digits mypasswd
Of course, you can use most of the additional features demonstrated above for wordlist mode with �incremental� mode as well. For example, on a large-scale penetration test, you may have John crack only root (UID 0) accounts in a set of password files:
john -i -u=0 *.pwd
7. If you�ve got a password file for which you already have a lot of passwords cracked or obtained by other means, and the passwords are unusual, then you may want to generate a new charset file, based on character frequencies from that password file only:
john --make-charset=custom.chr mypasswd
Then use that new file with �incremental� mode.
If you�ve got many password files from a particular country, organization, etc., it might be useful to use all of them for the charset file that you then use to crack even more passwords from these files or from some other password files from the same place:
 john --make-charset=custom.chr passwd1 passwd2
 [ Configure your custom "incremental" mode now. See below. ]
 john -i=custom passwd3
You can use some pre-defined or custom word filters when generating the charset file to have John consider some simpler passwords only:
john --make-charset=my_alpha.chr --external=filter_alpha mypasswd
If your �pot file� got large enough (or if you don�t have any charset files at all), you might want to use it to generate a new set of main charset files:
makechr
where �makechr� is a script that invokes �john �make-charset=�� with varying filenames, for all of the external mode word filters defined in the configuration file. In this example, John will overwrite the charset files with new ones that are based on your entire $JOHN/john.pot (John uses the entire �pot file� if you don�t specify any password files).
8. Finally, you might want to e-mail all users with weak passwords to tell them to change their passwords. (This is not always a good idea, though, since lots of people do not check their e-mail or ignore such messages, and the messages can be a hint for crackers.) Edit the �mailer� script supplied with John: the message it sends and possibly the mail command (especially if the password file is from a different machine). Then run:
mailer mypasswd
Configuration file.
Please refer to
CONFIG for general information on the configuration file and its possible locations.
1. Let�s assume that you notice that in some password file a lot of users have their passwords set to login names with �?!� appended. Then you just make a new �single crack� mode rule (see
RULES for information on the syntax) and place it somewhere near the beginning:
 [List.Rules:Single]
 Az"?!"
Hint: if you want to temporarily disable all of the default rules, you can simply rename the section to something John doesn�t use and define a new one with the section�s old name, but be sure to leave the �List.� prefix of the name intact to maintain correct configuration file syntax.
All the same applies to wordlist mode rules as well.
2. If you generate a custom charset file (described above) you will also need to define a configuration file section with the �incremental� mode parameters. In the simplest case it will be like this (where �Custom� can be replaced with any name you like):
 [Incremental:Custom]
 File = custom.chr
This way, John will only use characters from passwords used to generate the charset file only. To make John try some more characters, add:
Extra = !@#$%
These extra characters will then be added, but still considered the least probable. If you want to make sure that, with your extra characters, John will try 95 different characters, you can add:
CharCount = 95
This will make John print a warning if it only has fewer than 95 characters in its charset.
You can also use CharCount to limit the number of different characters that John tries, even if the charset file has more:
CharCount = 20
If you didn�t use any filters when generating the charset file, setting CharCount this low will make John never attempt rare characters and character combinations, not even for really short passwords, spending the time on simple longer candidate passwords instead. However, the default length switching is usually smart enough so that you shouldn�t need this trick.
To make John try passwords of certain lengths only, use the following lines:
 MinLen = 6
 MaxLen = 8
Setting �MinLen� high, as in the example above, is reasonable if shorter passwords weren�t allowed to set on the machine you got the password file from (however, note that root can usually set any password for any user and there are often loopholes in operating systems� password policy enforcement capabilities).
On the contrary, you may want to set �MaxLen� low if you think there are a lot of short passwords.
3. Another example: a lot of users at some site use short duplicated words as their passwords, such as �fredfred�. As the number of such potential passwords is fairly low, it makes sense to code a new external cracking mode that tries them all, up to some length.
You can find the actual implementation of such a cracking mode with lots of comments in the default configuration file supplied with John. Please refer to
EXTERNAL for information on the programming language used.
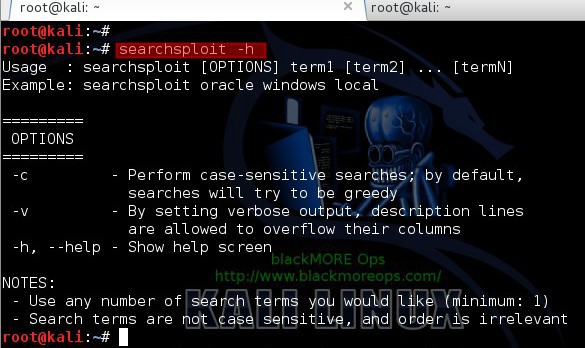
 On October 21, 2009, the Metasploit Project announced that it had been acquired by Rapid7, a security company that provides unified vulnerability management solutions. Metasploit�s emerging position as the de facto exploit development framework led to the release of software vulnerability advisories often accompanied by a third party Metasploit exploit module that highlights the exploitability, risk and remediation of that particular bug. Metasploit 3.0 began to include fuzzing tools, used to discover software vulnerabilities, rather than just exploits for known bugs. This avenue can be seen with the integration of the lorcon wireless (802.11) toolset into Metasploit 3.0 in November 2006. Metasploit 4.0 was released in August 2011. In this guide we will look into the most important part of using Metasploit, how to search exploits within it! Yeah, like it or not, if you can�t search, then you got nada!
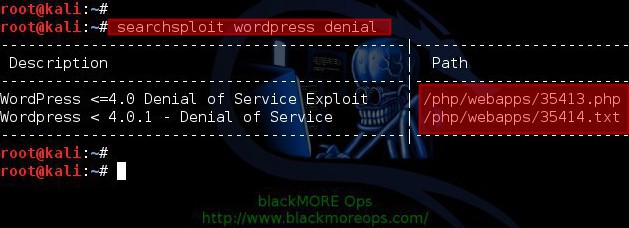
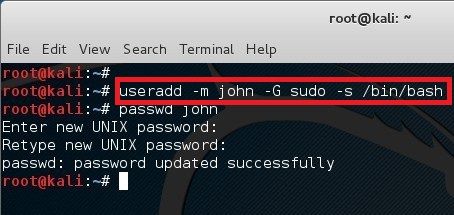 In Linux, password hash is stored in /etc/shadow file. For the sake of this exercise, I will create a new user names john and assign a simple password �password� to him.
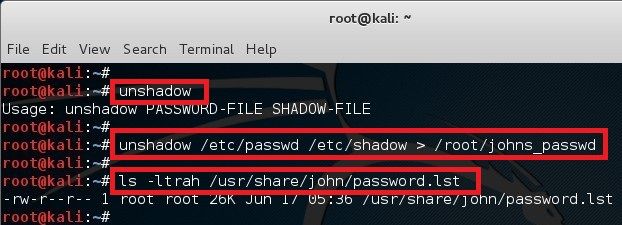 The unshadow command will combine the extries of /etc/passwd and /etc/shadow to create 1 file with username and password details. When you just type in unshadow, it shows you the usage anyway.
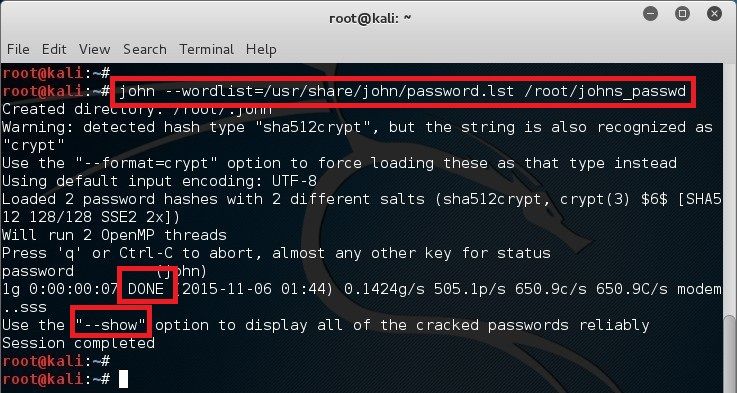
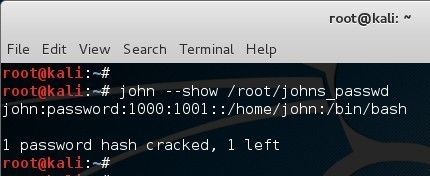 Looks like it worked. So we can now use john �show option to list cracked passwords. Note that it�s a simple password that existed in the dictionary so it worked. If it wasn�t a simple password, then you would need a much bigger dictionary and lot longer to to crack it.


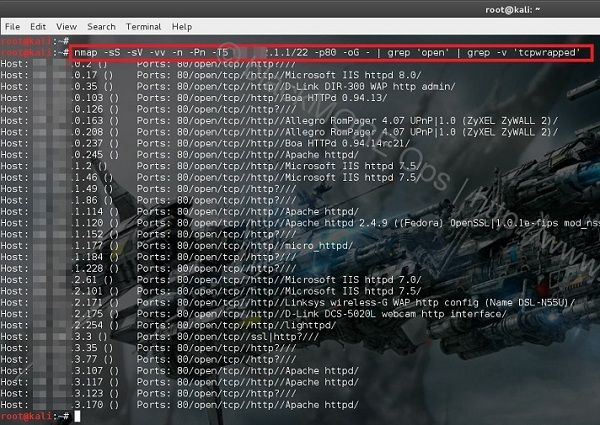
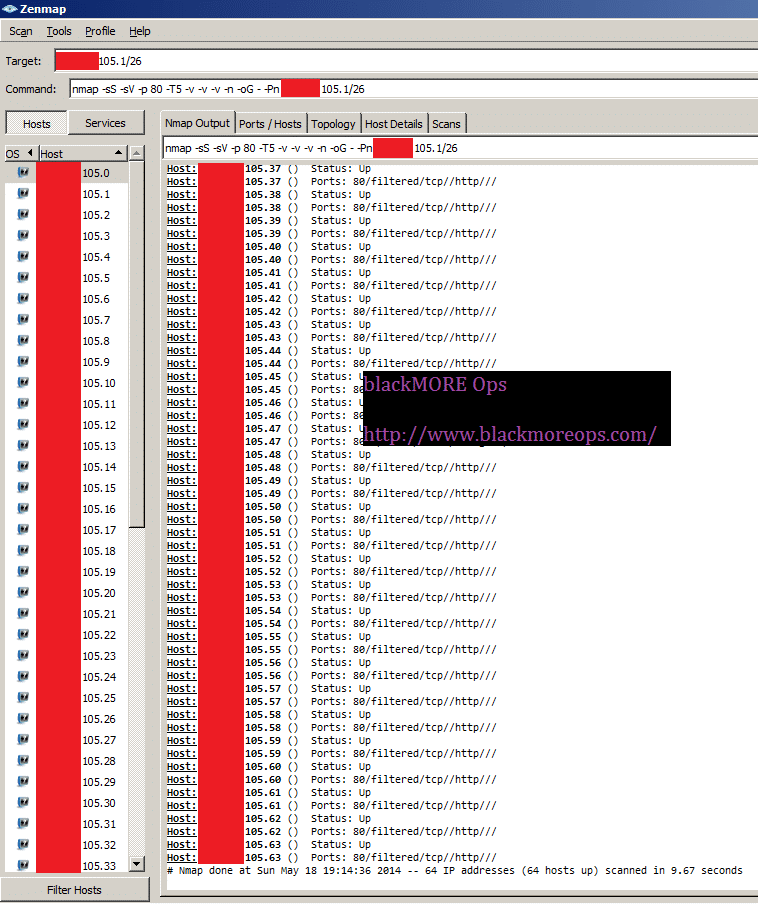
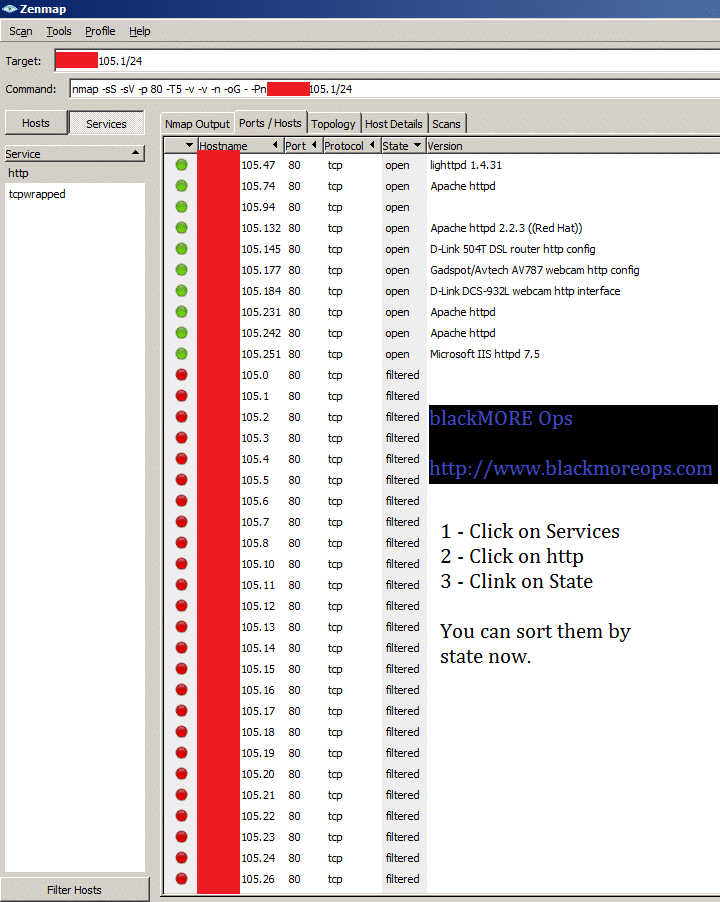
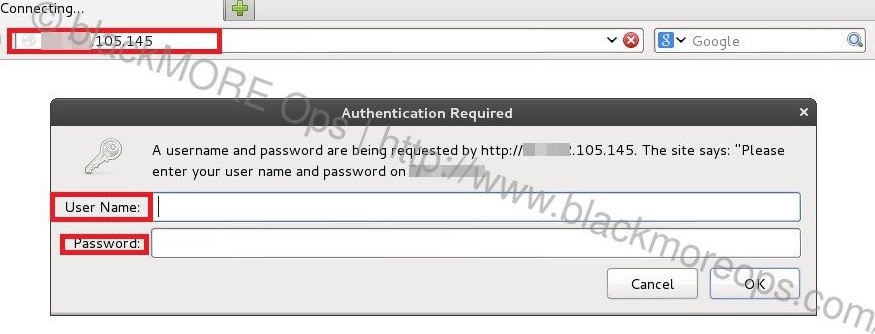
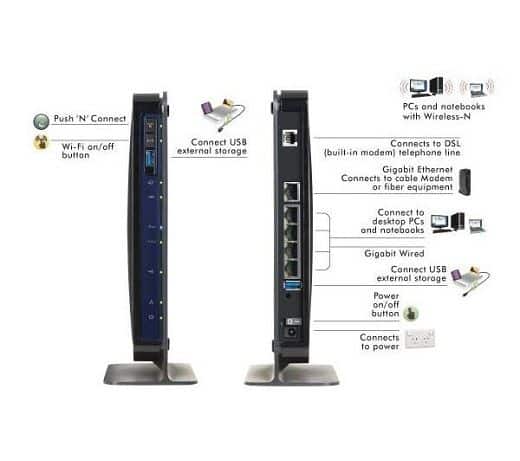 In this guide I will show you show you how to scan IP range for connected ADSL or DSL modem routers and find DSL ADSL router hack remotely. This guide applies to Windows, Linux or Mac, so it doesn�t matter what�s your Operating system is, you can try the same steps from all these operating systems. The term DSL or ADSL modem is technically used to describe a modem which connects to a single computer, through a USB port or is installed in a computer PCI slot. The more common DSL or ADSL router which combines the function of a DSL or ADSL modem and a home router, is a standalone device which can be connected to multiple computers through multiple Ethernet ports or an integral wireless access point. Also called a residential gateway, a DSL or ADSL router usually manages the connection and sharing of the DSL or ADSL service in a home or small office network.