Friday, 31 March 2017

kodi: how to install fusion repo on kali linux (PART - 2)

kali linux : first install kodi than follow these steps  steps to install kodi in kali linux given here :- how to install kodi in kali linux


 How to Install Fusion Kodi (Jarvis & Krypton)

Here is a guide for installing Fusion for Kodi. With Fusion installed you will have access to a wide range of repos from which you can install all the add-ons you need.


To Install Fusion on Kodi:
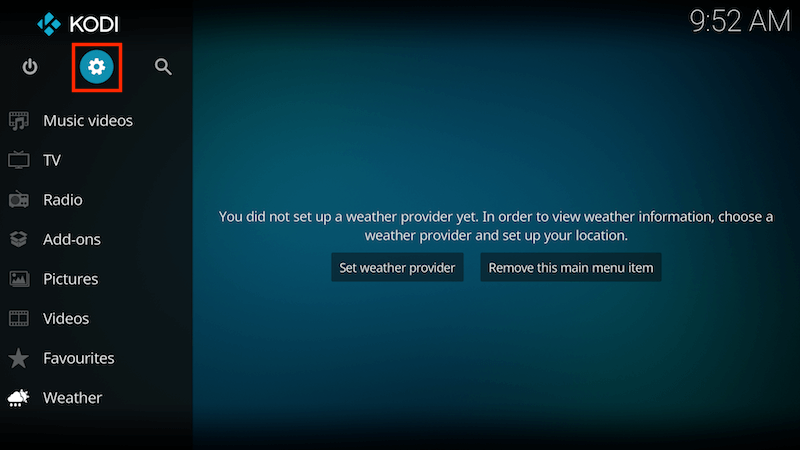
  • Open Kodi
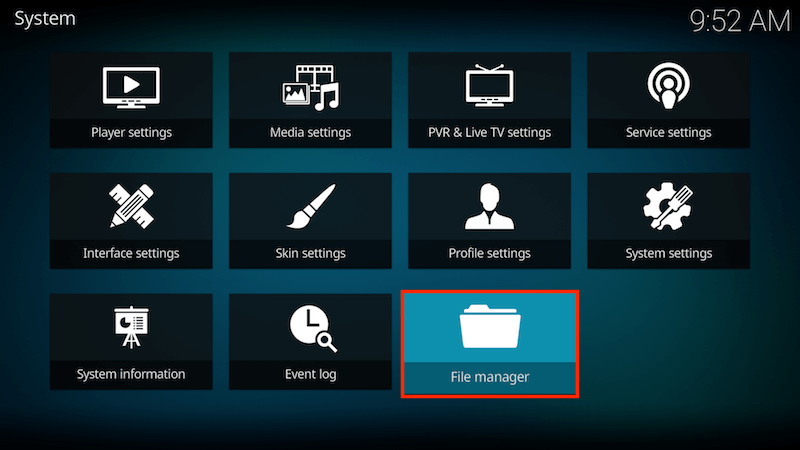
  • Select SYSTEM > File Manager
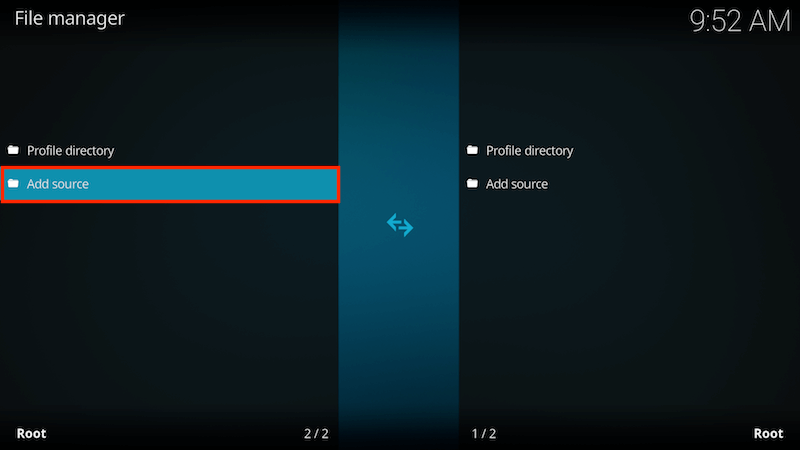
  • Select Add Source
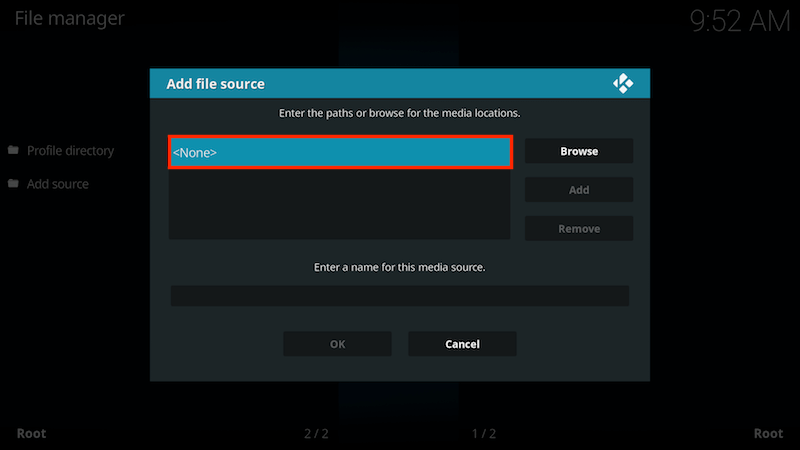
  • Select None
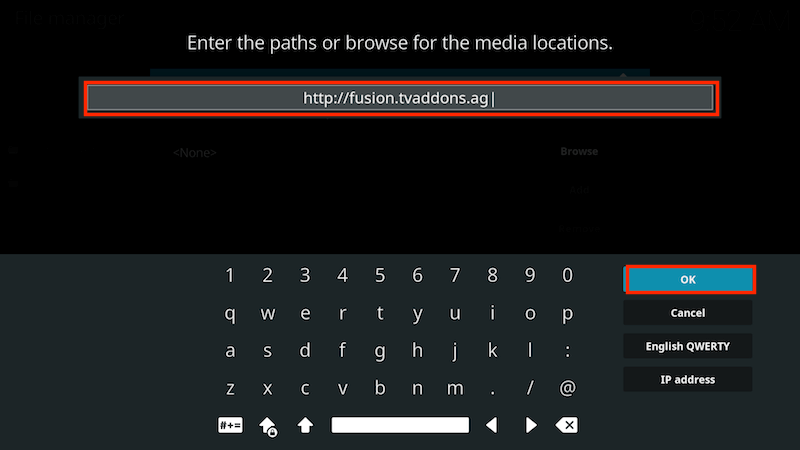
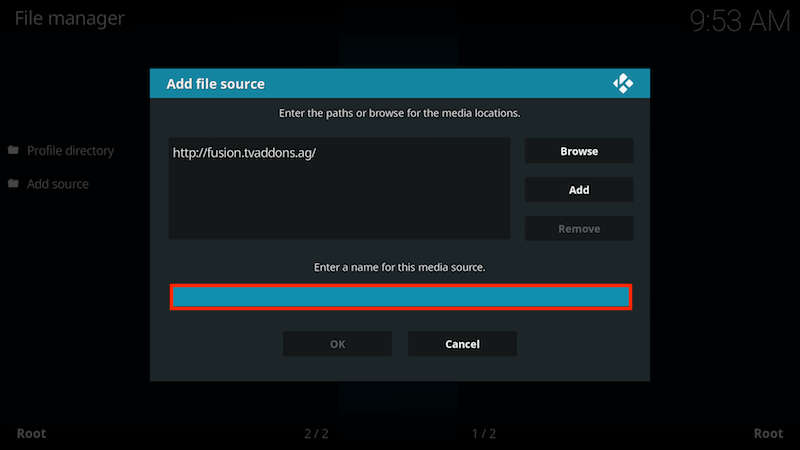
  • Type the following EXACTLY http://fusion.tvaddons.ag and select Done
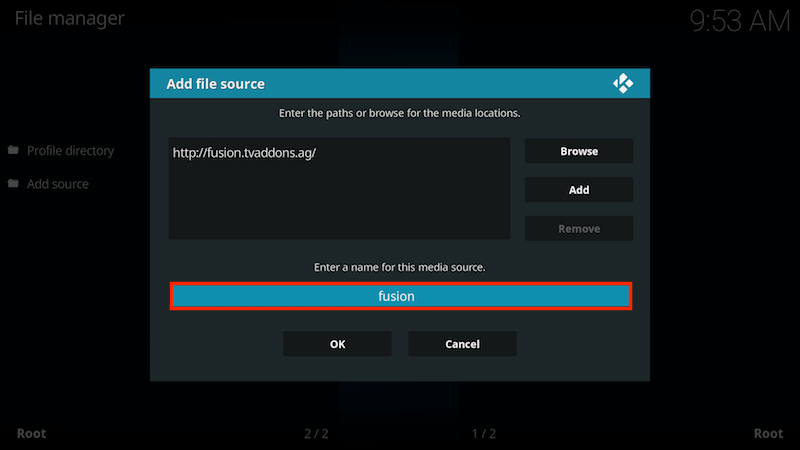
  • Highlight the box underneath Enter a name for this media Source & type fusion
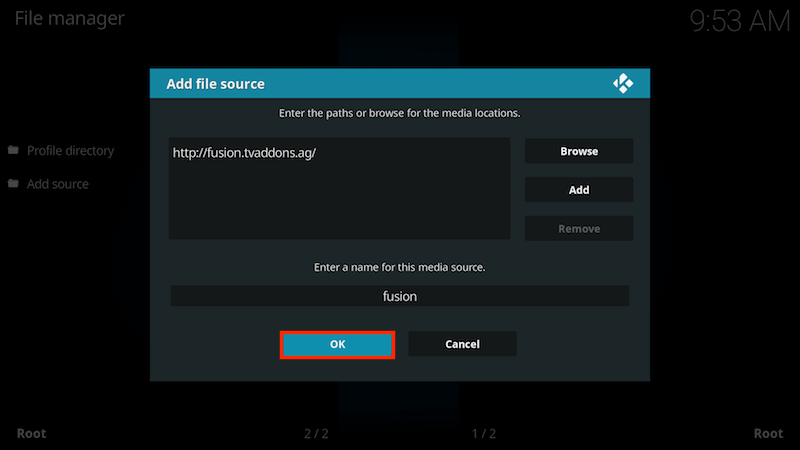
  • Select OK
Basically that is all you need to do to get Fusion on your device. To use Fusion and install repos from it you need to do the following:
  • Go back to your Home Screen
  • Select SYSTEM
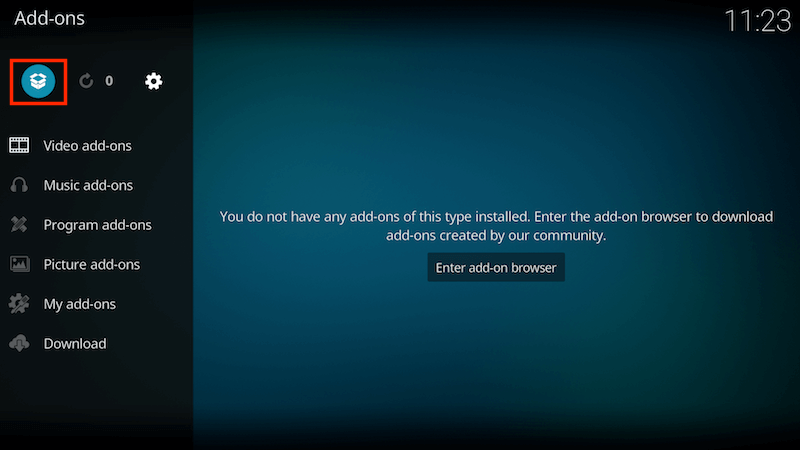
  • Select Add-Ons
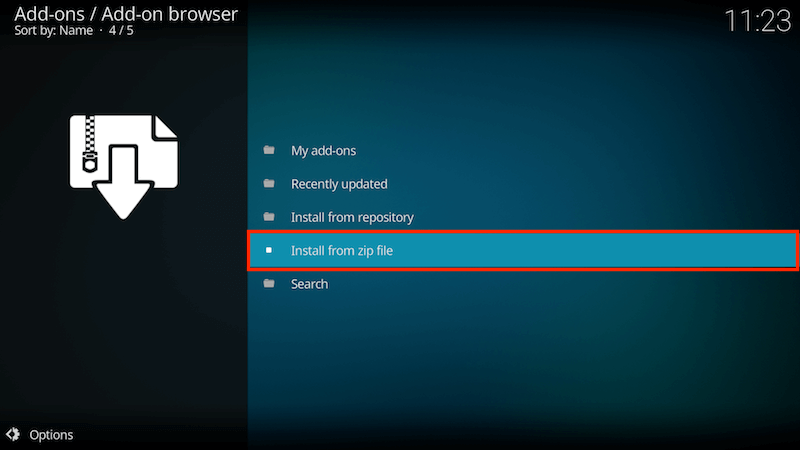
  • Select Install from zip file
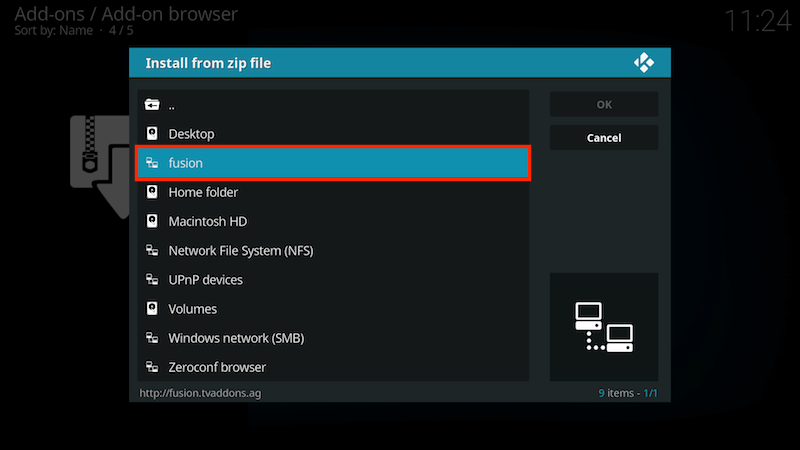
  • Select fusion
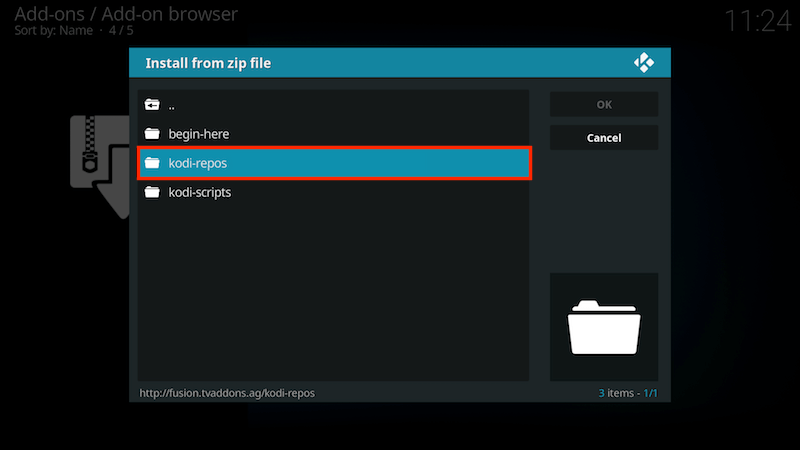
  • Select kodi-repos
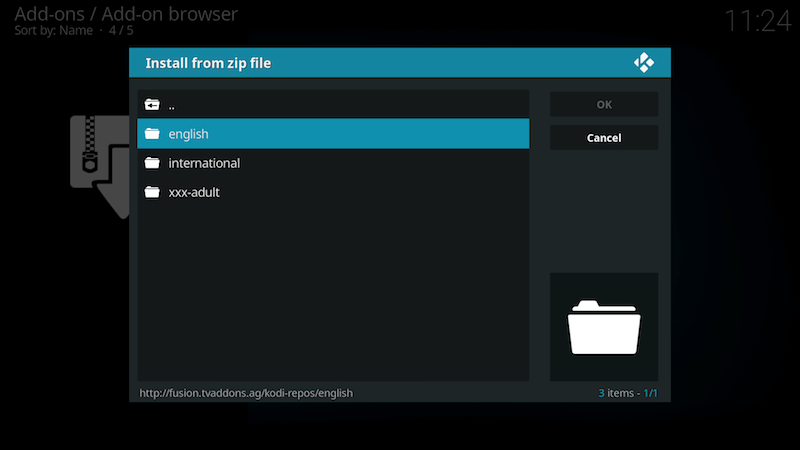
  • Select english/international/adult
From here you can now choose the repo's you wish to install

How to Install fusion on Kodi Krypton:
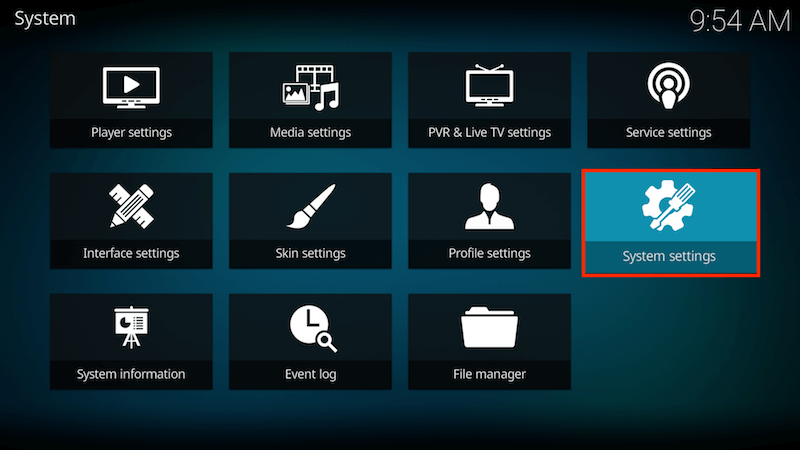
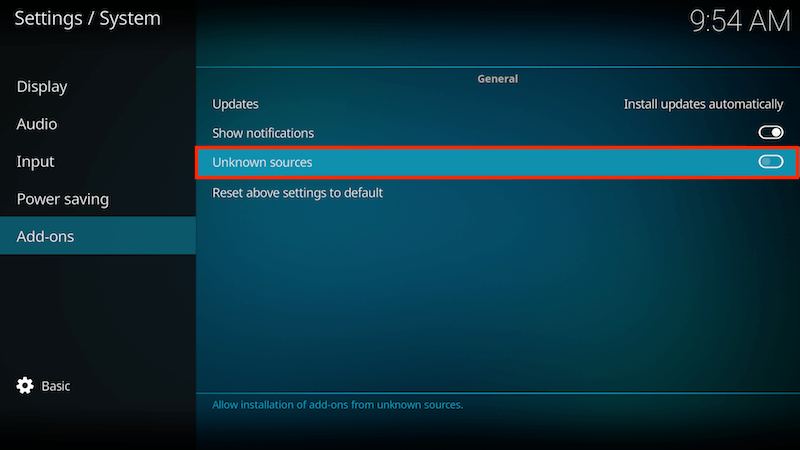
By Default Kodi 17 has Unknown Sources disabled. So we must enable this first. Once this is done it doesn't need doing again so if you have already done it just move down to the section marked Now to install an Add-on
  • Open Kodi
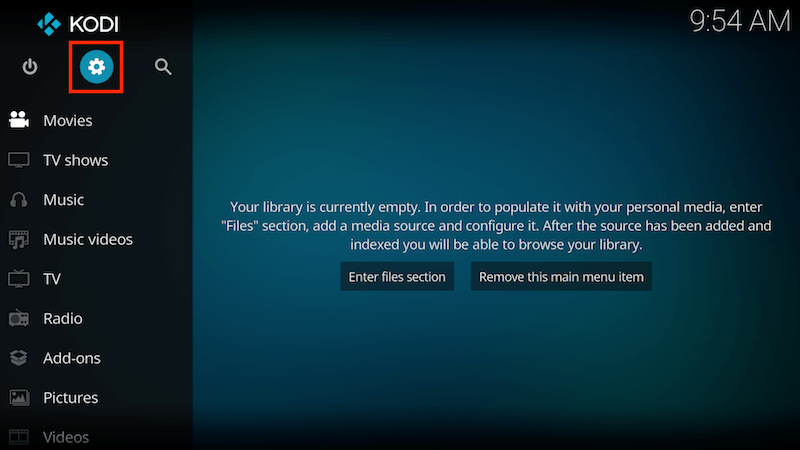
  • Select Settings

  • Select System Settings

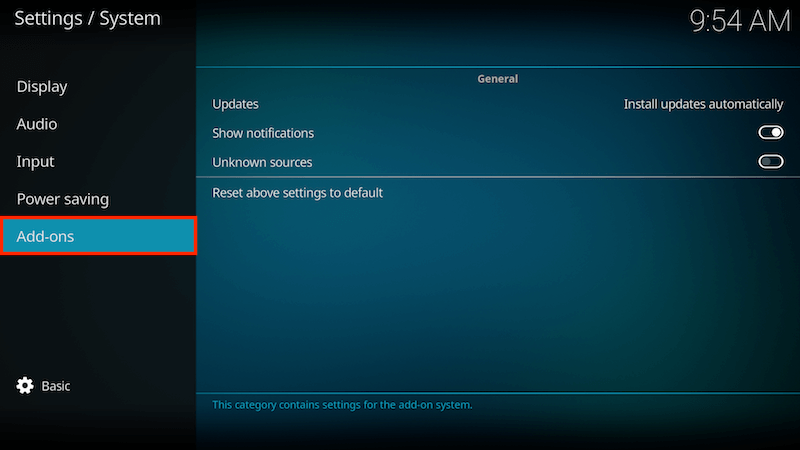
  • Select Add-ons

  • Turn on Unknown sources

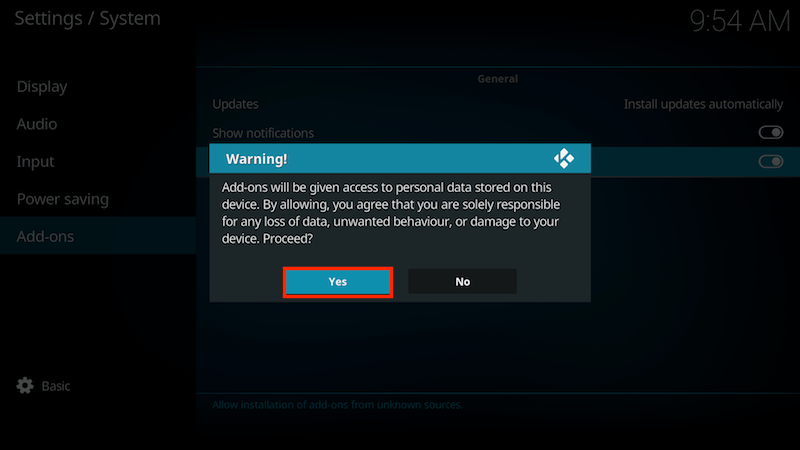
  • A warning will now appear asking if you agree that you are responsible for data loss, damage to device etc. As long as you are a sensible user then you are fine. Click Yes

Now to install an Add-on
  • From your Home Screen select Settings

  • Select File Manager

  • Select Add source

  • Select None

  • Type the following EXACTLY http://fusion.tvaddons.ag and select OK

  • Highlight the box underneath Enter a name for this media Source

  • Type fusion

  • Select OK

Basically that is all you need to do to get Fusion on your device. To use Fusion and install repos from it you need to do the following:
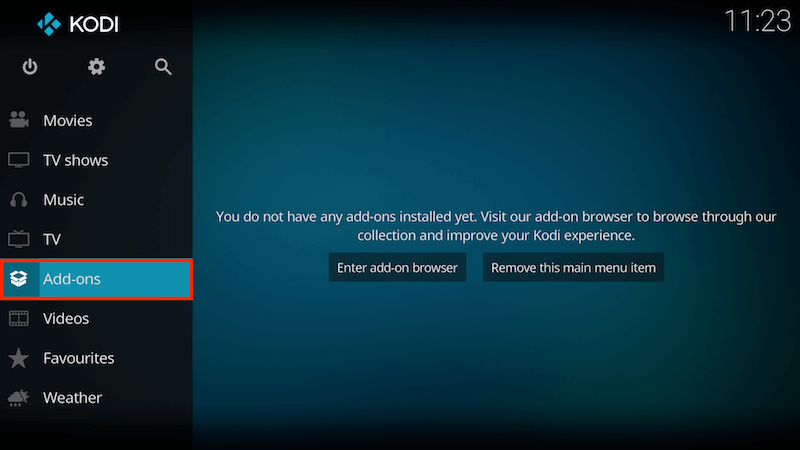
  • Go back to your Home Screen and select Add-ons

  • Select the Add-on Browser Icon

  • Select Install from zip file

  • Select fusion

  • Select kodi-repos

  • Select english/international/adult depending on the type of repo you are looking for.

From here you can now choose the repo's you wish to install..


 from english folder you can easly download any channel.. if you have any problem please comment in q/a arena....

Saturday, 25 March 2017

KODI - how to install kodi in kali linux / debian (PART-1)

What's Kodi?

Kodi is a free, open-source media player. Kodi started off on the Xbox, where it was known as Xbox Media Center (or XBMC), but that feels a long time ago: the software is now available on a huge range of platforms and in more than 65 languages, and incorporates the work of hundreds of programmers. And it's now known as Kodi, of course - the name change happened in 2014.

What does Kodi do?

It plays digital media. TV (live and recorded), films, other video, music, podcasts, photos, slideshows. That sort of thing.(you can watch free latest  movie , tv , game etc etc..yaa kodi is everything lol....

Sounds fairly standard.

Well, yes, but Kodi is designed to act as a media centre - the original idea was to install it on a PC that's connected to a big-screen TV - and has specific features for that role. Such as a '10-foot user interface', designed to be legible on a TV when sitting on a sofa, and compatibility with remote control hardware or software.
And speaking more generally, there are some advantages to Kodi that you don't get with other media players. It's compatible with a very wide range of file formats and OS platforms, and its open-source nature, high profile and large base of programmers mean there's a vast range of add-ons and reskins that you can download to customise the software to your heart's content.

Which operating systems is Kodi compatible with?

Kodi v17 'Krypton' is available on Windows, macOS, Linux, iOS, Android, Raspberry Pi and some others.


HOW-TO:Install Kodi for Linux

Debian, kali linux(for kali linux skip first steps)

1) The installation if you are using Debian (Jessie), you can use the debian-backports repository.
Add the following lines to your /etc/apt/sources.list file, as superuser (sudo)
# kodi repos
# starting with debian jessie, debian provides kodi via its backports repository
# remember: those packages are not supported by team kodi
deb http://http.debian.net/debian jessie-backports main
2) And then, update APT and install Kodi.
sudo apt-get update
sudo apt-get install kodi
Enjoy your new Kodi.


kodi: how to install fusion repo on kali linux (part -2)

steps to increase cracking speed in kali linux / debian / ubuntu /linux

 steps to increase cracking speed 
 if you have nvida graphic card than install driver to high speed your cracking 
steps given here :-

https://devilzlinux.blogspot.com/2017/03/prerequisites-first-youll-need-to.html

Attack modes (speed increased in these attack)

  • Brute-Force attack
  • Combinator attack
  • Dictionary attack
  • Hybrid attack
  • Mask attack
  • Rule-based attack
  • Toggle-Case attack
 hashcat -b
root@kali:~# hashcat -b
OpenCL Platform #1: NVIDIA Corporation
======================================
* Device #1: Geforce GTX 970, 1009/4095 MB allocatable, 13MCU

Hashtype: MD5
Speed.Dev.#1.....: 10443.1 MH/s
Hashtype: SHA1
Speed.Dev.#1.....: 3349.8 MH/s
Hashtype: SHA256
Speed.Dev.#1.....: 1321.8 MH/s
There are a multitude of configurations to improve cracking speed, not
 mentioned in this guide. However, we encourage you to take a look
 at the hashcat documentation for your specific cases

how to Install NVIDIA Drivers on Kali Linux (gtx. gt, nvida etc)

 how to Install gtx NVIDIA Drivers on Kali Linux


Prerequisites

First, you�ll need to ensure that your system is fully upgraded and that your card supports CUDA.

Note: GPUs with a CUDA compute capability > 5.0 are recommended, but GPUs with less will still work.
apt update && apt dist-upgrade -y && reboot

note - don't skip this command and please reboot . if u didnt reboot than your pc will stuck and there is no fix after that
 
Let�s determine the exact GPU installed, and check the kernel modules it�s using.
root@kali:~# lspci -v
01:00.0 VGA compatible controller: NVIDIA Corporation GM204 [GeForce GTX 970] (rev a1) (prog-if 00 [VGA controller])
    Subsystem: ZOTAC International (MCO) Ltd. GM204 [GeForce GTX 970]
    Region 1: Memory at e0000000 (64-bit, prefetchable) [size=256M]
    Capabilities: [60] Power Management version 3
    Capabilities: [68] MSI: Enable+ Count=1/1 Maskable- 64bit+
    Capabilities: [78] Express (v2) Legacy Endpoint, MSI 00
    Capabilities: [600 v1] Vendor Specific Information: ID=0001 Rev=1 Len=024
    Kernel driver in use: nouveau
    Kernel modules: nouveau


Installation

Once the system has rebooted, we will proceed to install the OpenCL ICD Loader, Drivers, and the CUDA toolkit. (this command will install nvidia driver and other important softwere and again restart your pc for active this .
apt install -y ocl-icd-libopencl1 nvidia-driver nvidia-cuda-toolkit

During installation of the drivers the system created new kernel modules, so another reboot is required.

from here steps given to check nvidia driver working correctly or not

Verify Driver Installation

Now that our system should be ready to go, we need to verify the drivers have been loaded correctly. We can quickly verify this by running the nvidia-smi tool.
root@kali:~# nvidia-smi    
+-----------------------------------------------------------------------------+
| NVIDIA-SMI 375.26                 Driver Version: 375.26                    |
|-------------------------------+----------------------+----------------------+
| GPU  Name        Persistence-M| Bus-Id        Disp.A | Volatile Uncorr. ECC |
| Fan  Temp  Perf  Pwr:Usage/Cap|         Memory-Usage | GPU-Util  Compute M. |
|===============================+======================+======================|
|   0  GeForce GTX 970     Off  | 0000:01:00.0      On |                  N/A |
| 36%   46C    P0    47W / 325W |    200MiB /  4036MiB |      0%      Default |
+-------------------------------+----------------------+----------------------+                                                                        
+-----------------------------------------------------------------------------+
| Processes:                                                       GPU Memory |
|  GPU       PID  Type  Process name                               Usage      |
|=============================================================================|
|    0       692    G   /usr/lib/xorg/Xorg                             198MiB |
+-----------------------------------------------------------------------------+
With the output displaying our driver and GPU correctly, we can now dive into benchmarking. Before we get too far ahead, let�s double check to make sure hashcat and CUDA are working together.
root@kali:~# hashcat -I
OpenCL Info:
Platform ID #1
  Vendor  : NVIDIA Corporation
  Name    : NVIDIA CUDA
  Version : OpenCL 1.2 CUDA 8.0.0
  Device ID #1
    Type           : GPU
    Vendor ID      : 32
    Vendor         : NVIDIA Corporation
    Name           : GeForce GTX 970
    Version        : OpenCL 1.2 CUDA
    Processor(s)   : 13
    Clock          : 1240
    Memory         : 1009/4036 MB allocatable
    OpenCL Version : OpenCL C 1.2
    Driver Version : 375.26
It appears everything is working, let�s go ahead and run a benchmark test.

Benchmarking

root@kali:~# hashcat -b
OpenCL Platform #1: NVIDIA Corporation
======================================
* Device #1: Geforce GTX 970, 1009/4095 MB allocatable, 13MCU

Hashtype: MD5
Speed.Dev.#1.....: 10443.1 MH/s
Hashtype: SHA1
Speed.Dev.#1.....: 3349.8 MH/s
Hashtype: SHA256
Speed.Dev.#1.....: 1321.8 MH/s
There are a multitude of configurations to improve cracking speed, not mentioned in this guide. However, we encourage you to take a look at the hashcat documentation for your specific cases.

Troubleshooting

In the event setup isn�t going as planned, we�ll install clinfo for detailed troubleshooting information.
apt install -y clinfo
OpenCL Loaders
It may be necessary to check for additional packages that may be conflicting with our setup. Let�s first check to see what OpenCL Loader we have installed. The NVIDIA OpenCL Loader and the generic OpenCL Loader will both work for our system.
root@kali:~# dpkg -l |grep -i icd
ii  nvidia-egl-icd:amd64                      375.26-2                             amd64        NVIDIA EGL installable client driver (ICD)
ii  nvidia-opencl-icd:amd64                   375.26-2                             amd64        NVIDIA OpenCL installable client driver (ICD)
ii  nvidia-vulkan-icd:amd64                   375.26-2                             amd64        NVIDIA Vulkan installable client driver (ICD)
ii  ocl-icd-libopencl1:amd64                  2.2.11-1                             amd64        Generic OpenCL ICD Loader
If mesa-opencl-icd is installed run:
apt remove mesa-opencl-icd
Since we have determined that we have a compatible ICD loader installed, we can easily determine which loader is currently being used.
root@kali:~# clinfo | grep -i "icd loader"
ICD loader properties
  ICD loader Name                                 OpenCL ICD Loader
  ICD loader Vendor                               OCL Icd free software
  ICD loader Version                              2.2.11
  ICD loader Profile                              OpenCL 2.1
As expected, our setup is using the open source loader that was installed earlier. Now, let�s get some detailed information about the system.
Querying GPU Information
We�ll use nvidia-smi once again, but with a much more verbose output.
root@kali:~# nvidia-smi -i 0 -q
Driver Version                      : 375.26
Attached GPUs                       : 1
GPU 0000:01:00.0
    Product Name                    : GeForce GTX 970
    Product Brand                   : GeForce
    Display Mode                    : Enabled
    Display Active                  : Enabled
    Persistence Mode                : Disabled
    Accounting Mode                 : Disabled
    Accounting Mode Buffer Size     : 1920
Temperature
        GPU Current Temp            : 47 C
        GPU Shutdown Temp           : 96 C
        GPU Slowdown Temp           : 91 C
    Clocks
        Graphics                    : 1101 MHz
        SM                          : 1101 MHz
        Memory                      : 3523 MHz
        Video                       : 1012 MHz
    Processes
        Process ID                  : 692
            Type                    : G
            Name                    : /usr/lib/xorg/Xorg
            Used GPU Memory         : 198 MiB
It looks like our GPU is being recognized correctly, so let�s use glxinfo to determine if 3D Rendering is enabled.
root@kali:~# glxinfo | grep -i "direct rendering"
direct rendering: Yes
The combination of these tools should assist the troubleshooting process greatly. If you still experience issues, we recommend searching for similar setups and any nuances that may affect your specific system.

Thursday, 23 March 2017

TorGhost - How to become anonymous online By Change IP on Kali Linux 2016.2 (Anonymouse Browsing) ?


TorGhost - How to become anonymous online By Change IP on Kali Linux 2016.2 (Anonymouse Browsing) ?


TorGhost � channel all traffic through tor network in kali linux


Tor is one of the best freely available network to protect your identity. Its considered safe because of its highly cryptographic data transfer methods.you can switch between exit nodes every 10 seconds manually with this script TorGhost for your ease.

Two main features of TorGhost

1. Routes all traffic
TorGhost can route all the network traffic through tor network i.e. every single application that tries to connect internet will go through tor network. No single ping will be leaked out, thus protecting your identity. Normally most of us use proxychain or similar application to route the traffic for a specific app. The problem is some application tends ignore proxy for much faster connection which can leak out sensitive information thus revealing your original identity or location. TorGhost can prevent you from this worst scenario. TorGhost set up a certain rules in iptables to route all outgoing connection though a certain proxy port. It also reject some sensitive incoming and outgoing request which may leak your original ip address.

2. DNS leak protection

DNS leak one of the serious issue in network security that most of us don�t know. Government organisations hunts down most of the hackers using this vulnerability. No matter how safe you encrypt dns leak is a serious issue. for more info:  What is DNS leak and how it affects your anonymity . TorGhost have a solution for that too. It can use a remote and anonymous DNS server to resolve hostname unlike other unsafe applications that uses dns provided by your ISP.


steps to install and start torghost

apt-get install tor
service tor start

Download and Install TorGhost

Open the terminal and follow the commands.
git clone https://github.com/susmithHCK/torghost.git
cd torghost

chmod installer and install torghost

 chmod +x install.sh
 ./install.sh
everything is ready now time to start  torghost

 torghost
 
To start torghost type the following command


 torghost start

To stop torghost type the following command


torghost stop


After this you no longer have to setup manual proxy for each applications such as browsers. Any doubts or questions? post it on the comment section below. If you like this blog give me a like on facebook and add me on google plus. Subscribe my youtube channel for video tutorials.

how to install tor in kali linux 2016.2


TOR stands for The Onion Router.it allows us to surf internet anonymously.it protects your privacy on internet.
 watch video for steps to install tor in linux


Tor Browser protects your privacy on internet by moving your traffic across different Tor servers .
Disclaimer � Our tutorials are designed to aid aspiring pen testers/security enthusiasts in learning new skills, we only recommend that you test this tutorial on a system that belongs to YOU. We do not accept responsibility for anyone who thinks it�s a good idea to try to use this to attempt to hack systems that do not belong to you

Why We need TOr Browser

The Tor software protects you by bouncing your communications around a distributed network of relays run by volunteers all around the world. It prevents somebody watching your Internet connection from learning what sites you visit.
it prevents the sites you visit from learning your physical location, and it lets you access sites which are blocked

Installing Tor Browser on Kali Linux

Usually it�s easy to install Tor all you need to do is download and install but there are couple of difficulties we face when we install on kali linux.So follow along me we will install Tor on Kali successfully.
Download Tor browser from here    Pick latest version and save it to hard drive.
t1
Once your downloading is finished then Open the terminal and change your directory that contain the tor browser let�s say your downloaded tor file is in desktop then type cd Desktop and hit enter.
extract the tar file type with the following command:
root@seven:~/Desktop# tar -xvf tor-browser-linux64-5.0.6_en-US.tar.xz
t2
Now go to the extracted directory.
t3
Now when you click tor browser setup file you will be presented with the following error message.So we need to bypass this error.
t4

Now open browser directory scroll down and find start-tor-browser and file and open with a text editor. � See more at: t5
Press control+f and write root in search box and find the following line and change it�s default value from 0 to 1 save and exit


t6


Now click on Tor Browser Setup file and you will presented with the following error.That�s because file is not owned by user[root].So we need to change it�s ownership.Just click on quit.
t7
Now make sure that you are inside the directory that contains tor browser files.Change your directory to the browser which is inside tor-browser_en-US.Your present working directory must be Browser. type the following command and hit enter that should be it.
root@seven:~/Desktop/tor-browser_en-US/Browser# chown -R root *
If above command is executed successfully then skip this step. Incase you get message like * directory does not exist then type the following command in your terminal:     chmod 1777 /tmp   Now re-executed   chown -R root *   command that should be it.
Now click on tor-browser setup / tor-browser again click connect.
t8


Enjoy anonymity guys if it helped you please share it thanks.

Monday, 20 March 2017

How To Install Python 3 and Set Up a Local Programming Environment on Ubuntu

How To Install Python 3 and Set Up a Local Programming Environment on Ubuntu

Introduction

This tutorial will get you up and running with a local Python 3 programming environment in Ubuntu 16.04.
Python is a versatile programming language that can be used for many different programming projects. First published in 1991 with a name inspired by the British comedy group Monty Python, the development team wanted to make Python a language that was fun to use. Easy to set up, and written in a relatively straightforward style with immediate feedback on errors, Python is a great choice for beginners and experienced developers alike. Python 3 is the most current version of the language and is considered to be the future of Python.
This tutorial will guide you through installing Python 3 on your local Linux machine and setting up a programming environment via the command line. This tutorial will explicitly cover the installation procedures for Ubuntu 16.04, but the general principles apply to any other distribution of Debian Linux.

Prerequisites

You will need a computer with Ubuntu 16.04 installed, as well as have administrative access to that machine and an internet connection.

Step 1 � Setting Up Python 3

We�ll be completing our installation and setup on the command line, which is a non-graphical way to interact with your computer. That is, instead of clicking on buttons, you�ll be typing in text and receiving feedback from your computer through text as well. The command line, also known as a shell, can help you modify and automate many of the tasks you do on a computer every day, and is an essential tool for software developers. There are many terminal commands to learn that can enable you to do more powerful things. The article �An Introduction to the Linux Terminal� can get you better oriented with the terminal.


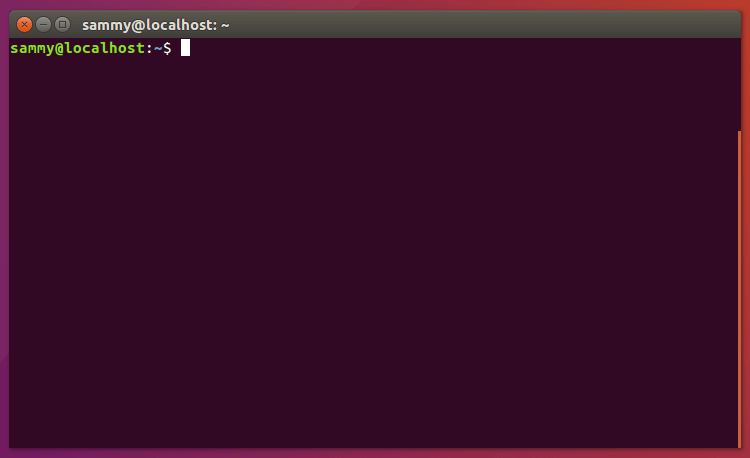
On Ubuntu 16.04, you can find the Terminal application by clicking on the Ubuntu icon in the upper-left hand corner of your screen and typing �terminal� into the search bar. Click on the Terminal application icon to open it. Alternatively, you can hit the CTRL, ALT, and T keys on your keyboard at the same
time to open the Terminal application automatically.
Ubuntu Terminal
Ubuntu 16.04 ships with both Python 3 and Python 2 pre-installed. To make sure that our versions are up-to-date, let�s update and upgrade the system with apt-get:

  •  

  •  

  •  

  • sudo apt-get update

  • sudo apt-get -y upgrade


The -y flag will confirm that we are agreeing for all items to be installed, but depending on your version of Linux, you may need to confirm additional prompts as your system updates and upgrades.
Once the process is complete, we can check the version of Python 3 that is installed in the system by typing:

  • python3 -V


You will receive output in the terminal window that will let you know the version number. The version number may vary, but it will look similar to this:

Output

Python 3.5.2
To manage software packages for Python, let�s install pip:

  • sudo apt-get install -y python3-pip


A tool for use with Python, pip installs and manages programming packages we may want to use in our development projects. You can install Python packages by typing:

  • pip3 install package_name


Here, package_name can refer to any Python package or library, such as Django for web development or NumPy for scientific computing. So if you would like to install NumPy, you can do so with the command pip3 install numpy.
There are a few more packages and development tools to install to ensure that we have a robust set-up for our programming environment:

  • sudo apt-get install build-essential libssl-dev libffi-dev python-dev


Once Python is set up, and pip and other tools are installed, we can set up a virtual environment for our development projects.

Step 2 � Setting Up a Virtual Environment


Virtual environments enable you to have an isolated space on your computer for Python projects, ensuring that each of your projects can have its own set of dependencies that won�t disrupt any of your other projects.
Setting up a programming environment provides us with greater control over our Python projects and over how different versions of packages are handled. This is especially important when working with third-party packages.
You can set up as many Python programming environments as you want. Each environment is basically a directory or folder in your computer that has a few scripts in it to make it act as an environment.
We need to first install the venv module, part of the standard Python 3 library, so that we can invoke the pyvenv command which will create virtual environments for us. Let�s install venv by typing:

  • sudo apt-get install -y python3-venv


With this installed, we are ready to create environments. Let�s choose which directory we would like to put our Python programming environments in, or we can create a new directory with mkdir, as in:

  • mkdir environments

  • cd environments


Once you are in the directory where you would like the environments to live, you can create an environment by running the following command:

  • pyvenv my_env


Essentially, pyvenv sets up a new directory that contains a few items which we can view with the ls command:

  • ls my_env


Output

bin include lib lib64 pyvenv.cfg share
Together, these files work to make sure that your projects are isolated from the broader context of your local machine, so that system files and project files don�t mix. This is good practice for version control and to ensure that each of your projects has access to the particular packages that it needs. Python Wheels, a built-package format for Python that can speed up your software production by reducing the number of times you need to compile, will be in the Ubuntu 16.04 share directory.
To use this environment, you need to activate it, which you can do by typing the following command that calls the activate script:

  • source my_env/bin/activate


Your prompt will now be prefixed with the name of your environment, in this case it is called my_env. Your prefix may look somewhat different, but the name of your environment in parentheses should be the first thing you see on your line:


This prefix lets us know that the environment my_env is currently active, meaning that when we create programs here they will use only this particular environment�s settings and packages.
Note: Within the virtual environment, you can use the command python instead of python3, and pip instead of pip3 if you would prefer. If you use Python 3 on your machine outside of an environment, you will need to use the python3 and pip3 commands exclusively.
After following these steps, your virtual environment is ready to use.

Step 3 � Creating a Simple Program


Now that we have our virtual environment set up, let�s create a simple �Hello, World!� program. This will make sure that our environment is working and gives us the opportunity to become more familiar with Python if we aren�t already.
To do this, we�ll open up a command-line text editor such as nano and create a new file:

  • nano hello.py


Once the text file opens up in the terminal window we�ll type out our program:
print("Hello, World!")
Exit nano by typing the control and x keys, and when prompted to save the file press y.
Once you exit out of nano and return to your shell, let�s run the program:

  • python hello.py


The hello.py program that you just created should cause your terminal to produce the following output:

Output

Hello, World!
To leave the environment, simply type the command deactivate and you will return to your original directory.

How To Install Python 3 and Set Up a Local Programming Environment on macOS

How To Install Python 3 and Set Up a Local Programming Environment on macOS

Introduction

Python is a versatile programming language that can be used for many different programming projects. First published in 1991 with a name inspired by the British comedy group Monty Python, the development team wanted to make Python a language that was fun to use. Easy to set up, and written in a relatively straightforward style with immediate feedback on errors, Python is a great choice for beginners and experienced developers alike. Python 3 is the most current version of the language and is considered to be the future of Python.
This tutorial will guide you through installing Python 3 on your local macOS machine and setting up a programming environment via the command line.

Prerequisites

You will need a macOS computer with administrative access that is connected to the internet.

Step 1 � Opening Terminal

We�ll be completing most of our installation and set up on the command line, which is a non-graphical way to interact with your computer. That is, instead of clicking on buttons, you�ll be typing in text and receiving feedback from your computer through text as well. The command line, also known as a shell, can help you modify and automate many of the tasks you do on a computer every day, and is an essential tool for software developers.
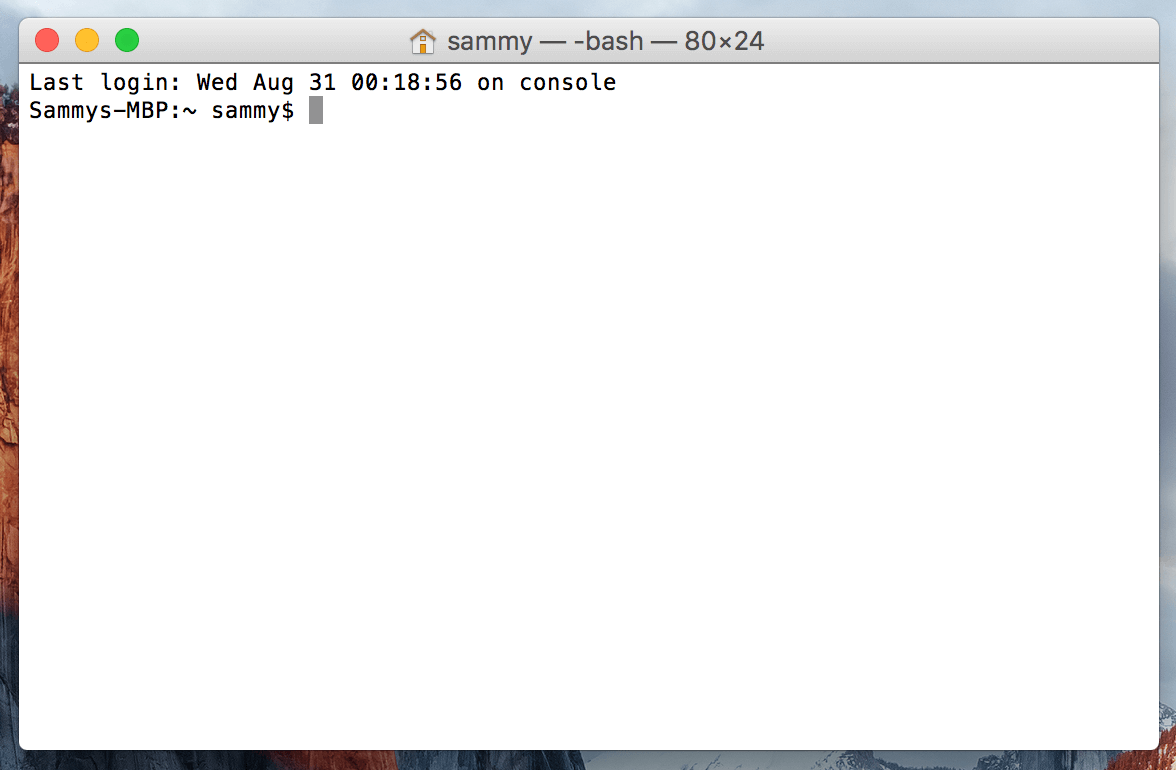
The macOS Terminal is an application you can use to access the command line interface. Like any other application, you can find it by going into Finder, navigating to the Applications folder, and then into the Utilities folder. From here, double-click the Terminal like any other application to open it up. Alternatively, you can use Spotlight by holding down the command and spacebar keys to find Terminal by typing it out in the box that appears.
macOS Terminal
There are many more Terminal commands to learn that can enable you to do more powerful things. The article �An Introduction to the Linux Terminal� can get you better oriented with the Linux Terminal, which is similar to the macOS Terminal.

Step 2 � Installing Xcode

Xcode is an integrated development environment (IDE) that is comprised of software development tools for macOS. You may have Xcode installed already. To check, in your Terminal window, type:

  • xcode-select -p


If you receive the following output, then Xcode is installed:

Output

/Library/Developer/CommandLineTools
If you received an error, then in your web browser install Xcode from the App Store and accept the default options.
Once Xcode is installed, return to your Terminal window. Next, you�ll need to install Xcode�s separate Command Line Tools app, which you can do by typing:

  • xcode-select --install


At this point, Xcode and its Command Line Tools app are fully installed, and we are ready to install the package manager Homebrew.

Step 3 � Installing and Setting Up Homebrew

While the OS X Terminal has a lot of the functionality of Linux Terminals and other Unix systems, it does not ship with a good package manager. A package manager is a collection of software tools that work to automate installation processes that include initial software installation, upgrading and configuring of software, and removing software as needed. They keep installations in a central location and can maintain all software packages on the system in formats that are commonly used. Homebrew provides OS X with a free and open source software package managing system that simplifies the installation of software on OS X.
To install Homebrew, type this into your Terminal window:

  • /usr/bin/ruby -e "$(curl -fsSL https://raw.githubusercontent.com/Homebrew/install/master/install)"


Homebrew is made with Ruby, so it will be modifying your computer�s Ruby path. The curl command pulls a script from the specified URL. This script will explain what it will do and then pauses the process to prompt you to confirm. This provides you with a lot of feedback on what the script is going to be doing to your system and gives you the opportunity to verify the process.
If you need to enter your password note that your keystrokes will not display in the Terminal window but they will be recorded, simply press the return key once you�ve entered your password. Otherwise press the letter y for �yes� whenever you are prompted to confirm the installation.
Let�s walk through the flags that are associated with the curl command:
  • The -f or --fail flag tells the Terminal window to give no HTML document output on server errors.
  • The -s or --silent flag mutes curl so that it does not show the progress meter, and combined with the -S or --show-error flag it will ensure that curl shows an error message if it fails.
  • The -L or --location flag will tell curl to redo the request to a new place if the server reports that the requested page has moved to a different location.
Once the installation process is complete, we�ll put the Homebrew directory at the top of the PATH environment variable. This will ensure that Homebrew installations will be called over the tools that Mac OS X may select automatically that could run counter to the development environment we�re creating.
You should create or open the ~/.bash_profile file with the command-line text editor nano using the nano command:

  • nano ~/.bash_profile


Once the file opens up in the Terminal window, write the following:
export PATH=/usr/local/bin:$PATH
To save your changes, hold down the control key and the letter o, and when prompted press the return key. Now you can exit nano by holding the control key and the letter x.
For these changes to activate, in the Terminal window, type:

  • source ~/.bash_profile


Once you have done this, the changes you have made to the PATH environment variable will be effective.
We can make sure that Homebrew was successfully installed by typing:

  • brew doctor


If no updates are required at this time, the Terminal output will read:

Output

Your system is ready to brew.
Otherwise, you may get a warning to run another command such as brew update to ensure that your installation of Homebrew is up to date.
Once Homebrew is ready, you can install Python 3.

Step 4 � Installing Python 3

You can use Homebrew to search for everything you can install with the brew search command, but to provide us with a shorter list, let�s instead search for just the available Python-related packages or modules:

  • brew search python


The Terminal will output a list of what you can install, like this:

Output

app-engine-python micropython python3
boost-python python wxpython
gst-python python-markdown zpython
homebrew/apache/mod_python homebrew/versions/gst-python010
homebrew/python/python-dbus Caskroom/cask/kk7ds-python-runtime
homebrew/python/vpython Caskroom/cask/mysql-connector-python

Python 3 will be among the items on the list. Let�s go ahead and install it:

  • brew install python3


The Terminal window will give you feedback regarding the installation process of Python 3, it may take a few minutes before installation is complete.
Along with Python 3, Homebrew will install pip, setuptools and wheel.
A tool for use with Python, we will use pip to install and manage programming packages we may want to use in our development projects. You can install Python packages by typing:

  • pip3 install package_name


Here, package_name can refer to any Python package or library, such as Django for web development or NumPy for scientific computing. So if you would like to install NumPy, you can do so with the command pip3 install numpy.
setuptools facilitates packaging Python projects, and wheel is a built-package format for Python that can speed up your software production by reducing the number of times you need to compile.
To check the version of Python 3 that you installed, you can type:

  • python3 --version


This will output the specific version of Python that is currently installed, which will by default be the most up-to-date stable version of Python 3 that is available.

Step 5 � Creating a Virtual Environment

Now that we have Xcode, Homebrew, and Python installed, we can go on to create our programming environment with Pyvenv.
Virtual environments enable you to have an isolated space on your computer for Python projects, ensuring that each of your projects can have its own set of dependencies that won�t disrupt any of your other projects.
Setting up a programming environment provides us with greater control over our Python projects and over how different versions of packages are handled. This is especially important when working with third-party packages.
You can set up as many Python programming environments as you would like. Each environment is basically a directory or folder in your computer that has a few scripts in it to make it act as an environment.
Choose which directory you would like to put your Python programming environments in, or create a new directory with mkdir, as in:

  • mkdir Environments

  • cd Environments


Once you are in the directory where you would like the environments to live, you can create an environment by running the following command:

  • pyvenv my_env


Essentially, this command creates a new directory (in this case called my_env) that contains a few items:
  • The pyvenv.cfg file points to the Python installation that you used to run the command.
  • The lib subdirectory contains a copy of the Python version and has a site-packages subdirectory inside it that starts out empty but will eventually hold the relevant third-party modules that you install.
  • The include subdirectory compiles packages.
  • The bin subdirectory has a copy of the Python binary along with the activate shell script that is used to set up the environment.
Together, these files work to make sure that your projects are isolated from the broader context of your local machine, so that system files and project files don�t mix. This is good practice for version control and to ensure that each of your projects has access to the particular packages that it needs.
To use this environment, you need to activate it, which you can do by typing the following command that calls the activate script:

  • source my_env/bin/activate


Your prompt will now be prefixed with the name of your environment, in this case it is called my_env:


This prefix lets us know that the environment my_env is currently active, meaning that when we create programs here they will use only this particular environment�s settings and packages.
Note: Within the virtual environment, you can use the command python instead of python3, and pip instead of pip3 if you would prefer. If you use Python 3 on your machine outside of an environment, you�ll need to use the python3 and pip3 commands exclusively, as python and pip will call an earlier version of Python.
After following these steps, your virtual environment is ready to use.

Step 6 � Creating a Simple Program

Now that we have our virtual environment set up, let�s create a simple �Hello, World!� program. This will make sure that our environment is working and gives us the opportunity to become more familiar with Python if we aren�t already.
To do this, we�ll open up a command-line text editor such as nano and create a new file:

  • nano hello.py


Once the text file opens up in Terminal we�ll type out our program:
print("Hello, World!")
Exit nano by typing the control and x keys, and when prompted to save the file press y.
Once you exit out of nano and return to your shell, let�s run the program:

  • python hello.py


The hello.py program that you just created should cause Terminal to produce the following output:

Output

Hello, World!
How To Install Python 3 and Set Up a Local Programming Environment on CentOS 7

How To Install Python 3 and Set Up a Local Programming Environment on CentOS 7

Introduction

Python is a versatile programming language that can be used for many different programming projects. First published in 1991 with a name inspired by the British comedy group Monty Python, the development team wanted to make Python a language that was fun to use. Easy to set up, and written in a relatively straightforward style with immediate feedback on errors, Python is a great choice for beginners and experienced developers alike. Python 3 is the most current version of the language and is considered to be the future of Python.
This tutorial will guide you through installing Python 3 on your local CentOS 7 machine and setting up a programming environment via the command line.

Prerequisites

You will need a CentOS 7 computer with a non-root superuser account that is connected to the internet.

Step 1 � Preparing the System

We will be completing this installation through the command line. If your CentOS 7 computer starts up with a Graphical User Interface (GUI) desktop, you can gain access to the command line interface through the Menu, by navigating to Applications, then Utilities, and then clicking on Terminal. If you need more guidance on the terminal, be sure to read through the article
Before we begin with the installation, let's make sure to update the default system applications to have the latest versions available.
We will be using the open-source package manager tool yum, which stands for Yellowdog Updater Modified. This is a commonly used tool for working with software packages on Red Hat based Linux systems like CentOS. It will let you easily install and update, as well as remove software packages on your computer.
Let�s first make sure that yum is up to date by running this command:

  • sudo yum -y update


The -y flag is used to alert the system that we are aware that we are making changes, preventing the terminal from prompting us to confirm.
Next, we will install yum-utils, a collection of utilities and plugins that extend and supplement yum:

  • sudo yum -y install yum-utils


Finally, we�ll install the CentOS Development Tools, which are used to allow you to build and compile software from source code:

  • sudo yum -y groupinstall development


Once everything is installed, our setup is in place and we can go on to install Python 3.

Step 2 � Installing and Setting Up Python 3

CentOS is derived from RHEL (Red Hat Enterprise Linux), which has stability as its primary focus. Because of this, tested and stable versions of applications are what is most commonly found on the system and in downloadable packages, so on CentOS you will only find Python 2.
Since instead we would like to install the most current upstream stable release of Python 3, we will need to install IUS, which stands for Inline with Upstream Stable. A community project, IUS provides Red Hat Package Manager (RPM) packages for some newer versions of select software.
To install IUS, let�s install it through yum:

  • sudo yum -y install https://centos7.iuscommunity.org/ius-release.rpm


Once IUS is finished installing, we can install the most recent version of Python, which, at the time of writing, is Python 3.5.2:

  • yum -y install python35u-3.5.2


When the installation process of Python is complete, we can check to make sure that the installation was successful by checking for its version number with the python3.5 command:

  • python3.5 -V


With Python 3.5.2 successfully installed, we will receive the following output:

Output

Python 3.5.2
We will next install pip, which will manage software packages for Python:

  • yum -y install python35u-pip


A tool for use with Python, we will use pip to install and manage programming packages we may want to use in our development projects. You can install Python packages by typing:

  • pip3.5 install package_name


Here, package_name can refer to any Python package or library, such as Django for web development or NumPy for scientific computing. So if you would like to install NumPy, you can do so with the command pip3.5 install numpy.
Finally, we will need to install the IUS package python35u-devel, which provides us with libraries and header files we will need for Python 3 development:

  • yum -y install python35u-devel


Among the libraries in the python35u-devel package is the pyvenv package that we will use to set up a virtual environment for our development projects in the next step.

Step 3 � Setting Up a Virtual Environment

Now that we have Python installed and our system set up, we can go on to create our programming environment with pyvenv.
Virtual environments enable you to have an isolated space on your computer for Python projects, ensuring that each of your projects can have its own set of dependencies that won�t disrupt any of your other projects.
Setting up a programming environment provides us with greater control over our Python projects and over how different versions of packages are handled. This is especially important when working with third-party packages.
You can set up as many Python programming environments as you want. Each environment is basically a directory or folder in your computer that has a few scripts in it to make it act as an environment.
Choose which directory you would like to put your Python programming environments in, or create a new directory with mkdir, as in:

  • mkdir environments

  • cd environments


Once you are in the directory where you would like the environments to live, you can create an environment by running the following command:

  • pyvenv-3.5 my_env


Essentially, this command creates a new directory (in this case called my_env) that contains a few items that we can see with the ls command:
bin include lib lib64 pyvenv.cfg
Together, these files work to make sure that your projects are isolated from the broader context of your local machine, so that system files and project files don�t mix. This is good practice for version control and to ensure that each of your projects has access to the particular packages that it needs.
To use this environment, you need to activate it, which you can do by typing the following command that calls the activate script in the bin directory:

  • source my_env/bin/activate


Your prompt will now be prefixed with the name of your environment, in this case it is called my_env:


This prefix lets us know that the environment my_env is currently active, meaning that when we create programs here they will use only this particular environment�s settings and packages.
Note: Within the virtual environment, you can use the command python instead of python3.5, and pip instead of pip3.5 if you would prefer. If you use Python 3 on your machine outside of an environment, you will need to use the python3.5 and pip3.5 commands exclusively.
After following these steps, your virtual environment is ready to use.

Step 4 � Creating a Simple Program

Now that we have our virtual environment set up, let�s create a simple �Hello, World!� program. This will make sure that our environment is working and gives us the opportunity to become more familiar with Python if we aren�t already.
To do this, we�ll open up a command-line text editor such as vim and create a new file:

  • vi hello.py


Once the text file opens up in our terminal window, we will have to type i to enter insert mode, and then we can write our first program:
print("Hello, World!")
Now press ESC to leave insert mode. Next, type :x then ENTER to save and exit the file.
We are now ready to run our program:

  • python hello.py


The hello.py program that you just created should cause the terminal to produce the following output:

Output

Hello, World!
To leave the environment, simply type the command deactivate and you�ll return to your original directory.

How to Install Python on Windows 7

How to Install Python on Windows 7

How to Install Python on Windows

Python 0
If you are looking for a simple application to learn programming or if you are an experienced software author, you can benefit from using the highly versatile and functional programming tool called Python.

About Python

Python was originally conceived and developed by a Dutchman named Guido van Rossum in the early 90�s. Though he is widely credited with the creation of Python, he had a lot of help from other contributors. Over the years, Guido and his team continued to improve the software until May of 2000 when they officially made the transition to BeOpen.com and made the software much more readily available to the world. It was no more than a year later, in 2001, when the PSF (Python Software Foundation) was created.
This non-profit organization was developed with a simple dream and sponsored by the Zope Corporation (then Digital Creations). That dream was and remains to this day, to:
promote, protect, and advance the Python programming language, and to support and facilitate the growth of a diverse and international community of Python programmers.
Python is a great alternative for programmers because it is an open source program developed under an OSI license. There is absolutely no charge to download, install, or run the program on any computer. The software is available in many different builds and supports 21 different operating systems and operating environment which gives it its universal appeal and cross system functionality.

Downloading Python

If you don�t already have a copy of Python installed on your computer, you will need to open up your Internet browser and go to the Python download page.
Python 1
Now that you are on the download page, select which of the software builds you would like to download. For the purposes of this article we will use the most up to date version available (Python 3.4.1).
Python 2
Once you have clicked on that, you will be taken to a page with a description of all the new updates and features of 3.4.1, however, you can always read that while the download is in process. Scroll to the bottom of the page till you find the �Download� section and click on the link that says �download page.�
Python 3
Now you will scroll all the way to the bottom of the page and find the �Windows x86 MSI installer.� If you want to download the 86-64 bit MSI, feel free to do so. We believe that even if you have a 64-bit operating system installed on your computer, the 86-bit MSI is preferable. We say this because it will still run well and sometimes, with the 64-bit architectures, some of the compiled binaries and Python libraries don�t work well.
Python 4

Installing Python

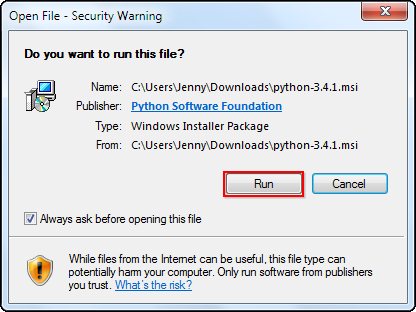
Once you have downloaded the Python MSI, simply navigate to the download location on your computer, double clicking the file and pressing Run when the dialog box pops up.
Python 5
If you are the only person who uses your computer, simply leave the �Install for all users� option selected. If you have multiple accounts on your PC and don�t want to install it across all accounts, select the �Install just for me� option then press �Next.�
Python 6
If you want to change the install location, feel free to do so; however, it is best to leave it as is and simply select next.
Python 7
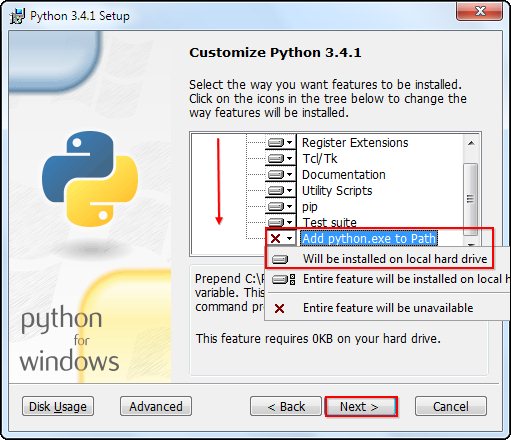
Scroll down in the window and find the �Add Python.exe to Path� and click on the small red �x.� Choose the �Will be installed on local hard drive� option then press �Next.�
Python 8
You will notice that the installation will bring up a command prompt window while Python downloads and installs �Pip.� Pip is just a package management tool. This will allow you to install all the additional Python packages that are available for download through PyPI (Python Package Index).
Python 9
Now that you have completed the installation process, click on �Finish.�
Python 10

Adding Python to System Path Variable

If you decided to use the Python 3.4.1, you will not need to follow this process. You can simply skip ahead to the next section. The reason is that the new update integrates this process in the installation phase and so you no longer need to manually add the System Path Variable.  If you want to add a second set of variables for Python, you can still follow the procedure but replace �27� with �34.�
If you chose to use the 2.7.3 version of Python, you will need to follow these steps. Once you have successfully installed Python, it is time to add it to the System Path Variable. Doing this will allow Python to run scripts on your computer without any conflicts of problems.
Begin by opening the start menu and typing in �environment� and select the option called �Edit the system environment variables.�
Python 11
When the �System Properties� window appears, click on �Environment Variables��
Python 12
Once you have the �Environment Variables� window open, direct your focus to the bottom half. You will notice that it controls all the �System Variables� rather than just this associated with your user. Click on �New�� to create a new variable for Python.
Python 13
Simply enter a name for your Path and the code shown below. For the purposes of this example we have installed Python 2.7.3, so we will call the path: �Pythonpath.�
The string that you will need to enter is: �C:\Python27\;C:\Python27\Scripts;
Python 14
Press �OK,� then �OK,� then �OK,� then the red �X� to accept all changes and exit the �System Properties� window.

Simple Print Directive

Now that we have successfully completed the installation process and added our �Environment Variable,� you are ready to create your first basic Python script. Let�s begin by opening Python�s GUI by pressing �Start� and typing �Python� and selecting the �IDLE (Python GUI).�
Python 15
Once the GUI is open, we will begin by using the simplest directive possible. This is the �print� directive which simply prints whatever you tell it to, into a new line. Start by typing a print directive like the one shown in the image below or copy and paste this text then press �Enter�: print (�Congratulations on executing your first print directive!�)
Python 16
With Python 3, the interactive mode signaled by the presence of �>>>� means you can do things like simple math without any directives. Try doing a few simple problems as shown in the image below.
Python 17